WHM (Web Host Manager)
From Hostek.com Wiki
Contents
WHM Help
WHM Documentation
- The link below will send you to the WHM Documentation, this will familiarize you with the interface and it's functions:
- https://documentation.cpanel.net/pages/viewpage.action?pageId=1507786
- For a different version of WHM, please see this page: https://documentation.cpanel.net/pages/viewpage.action?pageId=1507796
WHM Video Tutorials
- The link below will send you to our SmarterMail Video Tutorials Wiki:
Account Management
- The link below will send you to our Linux/cPanel Reseller Management Wiki:
WHM Errors
Error Handling
- The link below will send you to our Error Handling Wiki:
Common WHM Errors
- This wiki goes over known WHM errors that appear often and provides fixes and workarounds for them.
Using nameservers with the following IPs: xxx.xxx.xxx.xxx,xxx.xxx.xxx.xxx Sorry, the domain is already pointed to an IP address that does not appear to use DNS servers associated with this server.
Please transfer the domain to this servers nameservers or have your administrator add one of its nameservers to /etc/ips.remotedns and make the proper A entries on that remote nameserver.
- If you haven't pointed the domain to your VPS yet, or DSN hasn't propagated you may get this error.
- A work around:
- Log in to WHM.
- Select Server Configuration.
- Select Tweak Settings.
- Select the Domains tab.
- Change the setting for Allow Remote Domains.
- Click Save.
Linux/cPanel VPS
Helpful Links
- This link will take you to our SSH wiki:
- This link will take you to our IP Address Blocking Wiki:
- This link will take you to our VPS Resources Wiki:
- This link will take you to our Firewall Alert Wiki:
- This link will take you to our NameServer Wiki:
WHM/cPanel Updates
Updating from v.11.41 to v.11.46
- Before you can upgrade to v.11.46 you will need to uninstall the Frontpage extensions in WHM.
If doing this from SSH, use the following /scripts/upcp and it will upgrade to v.11.46
- Access WHM/cPanel and in the search bar, go to FrontPage.
- At the bottom, there is a check box to uninstall FrontPage extensions.
- Check it and update.
- Once removed, go to update cPanel and start the upgrade process.
Updating from v.11.38 to v.11.40
When cPanel puts out an update to their Web Host Manager (WHM) and cPanel systems, example v.11.38 to v.11.40, the update almost always includes a features change in WHM. They improve their settings and give more functionality to the hostmaster and list the updates in the Feature Showcase when you log in for the first time.
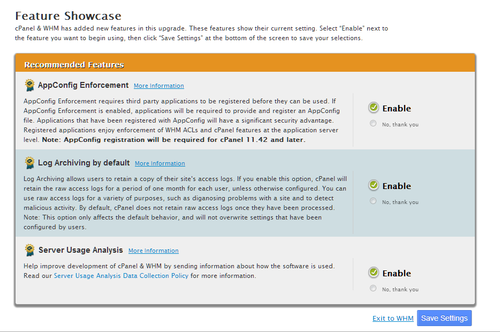
Feature Showcase
- When a user first logs back into WHM they are presented with a Feature Showcase.
- This showcase list the latest updates and gives the user an option to enable or not enable the new feature (see example below):
Options
- There are a few option to go with here. Some of these options are core features within WHM/cPanel and may require some thought.
- However, if you're not sure or don't wish to be bothered by this just go with Option #2 - Leave Features Disabled.
- Enable Features
- If you read through the options and have a good understanding of what they are and wish to implement them, simply select the Enable radial button and then click Save Settings.
- Leave Features Disabled
- If you wish to not enable the features then select the No, thank you radial button and click Save Settings.
- Get Assistance
- If you're not sure about the updated Feature set but wish to have more information and/or have us go ahead and enable/disable these features for you. Select the Exit to WHM option then put in a support ticket at https://support.hostek.com and we will be happy to assist you in this matter.
cPHulk Brute Force Protection
How to clear a cPHulk Block (GUI)
- If you're unable to login to WHM/cPanel like your normally do, chances are that you could be blocked by the cPHulk Brute Force Protection system that is part of cPanel. cPHulk blocks brute force attacks based on the number of failed logins from a specific IP.
If you have access to a computer on a different network (with a different IP)
- Login to WHM
- If you're able to login to go Security Center
- Find the cPHulk Brute Force Protection feature
- From here you are able to view and clear the blocked IPs and failed login attempts.
If you don't have access to a computer on a different network
- SSH into the VPS
- Temporarily Disable cPHulk with this command:
/usr/local/cpanel/bin/cphulk_pam_ctl --disable
- Login go WHM
- Go to Security Center
- Select cPHulk Brute Force Protection
- From here you are able to view and clear the blocked IPs and failed login attempts.
- Once you clear the block enable cPHulk.
- You can do this in the WHM cPHulk Brute Force Protection page or by running the following command in SSH:
/usr/local/cpanel/bin/cphulk_pam_ctl --enable
Clear cPHulk Block (Non-GUI)
- If for some reason you need to clear the blocks directly from the database, here is how you do it:
- SSH into your VPS
- Run this command:
mysql
- And this one:
use cphulkd;
| cPHulk SSH Commands | |
| Description | Syntax |
| To view the blocks: | SELECT * FROM brutes; |
| To view the login attempts: | SELECT * FROM logins; |
| To clear all blocks: | DELETE FROM brutes; |
| To clear all login attempts: | DELETE FROM logins; |
| To delete a block on a specific IP: | DELETE FROM brute WHERE IP = '0.0.0.0'; |
| To delete login attempts on a specific IP: | DELETE FROM logins WHERE IP = '0.0.0.0'; |
- For these changes to take effect you will need to Stop and Start (Restart) the cPHulk Service with these commands:
/usr/local/cpanel/bin/cphulk_pam_ctl --disable/usr/local/cpanel/bin/cphulk_pam_ctl --enable
