Manage DataSources (DSNs) in Windows Environment
Contents
First login to your WCP control panel for the account the domain is under: https://wcp.hostek.com
If you have any issues with logging into WCP then please see our tutorials on recovering your password if necessary
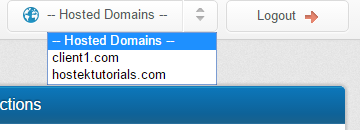
Once logged into WCP if you have multiple domains you may need to select the appropriate domain to manage using the 'Hosted Domains' drop-down in the top-right of the page as shown in the screenshot below:
- Click on the icon in the control panel labeled 'DataSources (DSNs)' under the Databases section.
- You should now see a list of any existing DSNs (if any).
Add a new DataSource
The above section gave instructions on navigating to DataSources in the control panel. Let's now show how to add a new datasource.
- Click on the icon in the control panel labeled 'DataSources (DSNs)' under the Databases section.
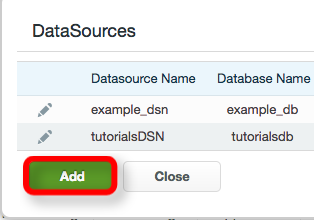
- You should now see a list of any existing DSNs (if any). Now to add a new Datasource click on the 'Add' button.
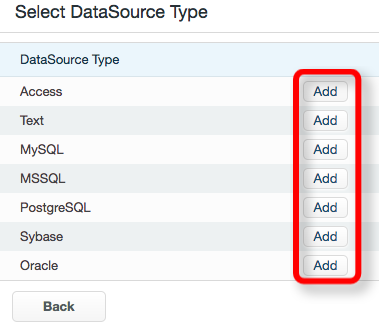
- You will now see a list of available DSN types.. depending on what kind of database this DSN is going to connect to. See a screenshot of the different types of DSNs you can create in the screenshot below:
- Click on the 'Add' button next to the type of DSN you want to add as shown in the above screenshot.. the next few sections will show the options listed for each of the different DSN types:
Access Database
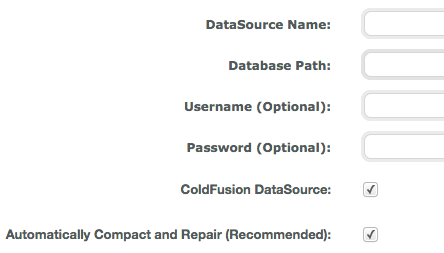
DataSource Name: The DataSource name is the actual name of the DSN that you'll be calling within your websites code (PHP,CF, etc.)
Database Path: The path field is the location within your website files to the Access database you're attempting to connect this DSN to. To the right of this field is a Browse button that you can use to navigate the directories of your website for this access database file.
Username (Optional): The username field is an optional field.. unless the access database you're attempting to connect to is a 2007 Access database (.accdb file).
Password (Optional): The password field is an optional field.. unless the access database you're attempting to connect to is a 2007 Access database (.accdb file).
ColdFusion DataSource: If your website is on a server that has ColdFusion installed then you will have a checkbox for ColdFusion DataSource. When this field is checked then the datasource will be created within ColdFusion as well as the default ODBC service.
Automatically Compact and Repair (Recommended): This option will do exactly what is sounds like. It will run a 'compact & repair' function on the access database. This will sometimes help in cases where the database is locked or user connections are stuck.
MySQL/MariaDB Database
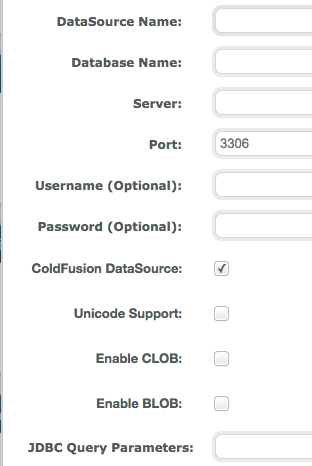
DataSource Name:The DataSource name is the actual name of the DSN that you'll be calling within your websites code (PHP,CF, etc.)
Database Name: Enter in the database name that you are connecting to (You can obtain from the MySQL section of the control panel).
Server: Enter in the server name for the database you are connecting to (You can obtain from the MySQL section of the control panel).
Port: Enter in the port for the MySQL server (All of our shared servers and VPS use the default MySQL port of '3306').
Username (Optional): Enter in the user name for the database you are wanting to connect to (You can obtain from the MySQL section of the control panel).
Password (Optional): Enter in the password to the user name you provided in the 'Username' field.
ColdFusion DataSource: If your website is on a server that has ColdFusion installed then you will have a checkbox for ColdFusion DataSource. When this field is checked then the datasource will be created within ColdFusion as well as the default ODBC service.
Unicode Support: Adds JDBC query parameters for Unicode character support.
Enable CLOB: Allows you to enable CLOB strings.
Enable BLOB: Allows you to enable BLOB strings.
JDBC Query Parameters: Allows custom JDBC query parameters to be added. These are name=value pairs. Multiple settings can be separated by the '&' character.
Example of JDBC Query Parameters: zeroDateTimeBehavior=convertToNull&characterEncoding=UTF-8
The full list of supported properties can be found at http://dev.mysql.com/doc/refman/5.0/en/connector-j-reference-configuration-properties.html.
MS SQL Database
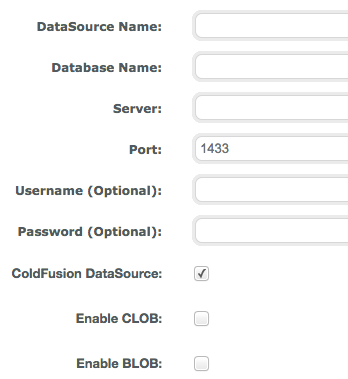
DataSource Name:The DataSource name is the actual name of the DSN that you'll be calling within your websites code (PHP,CF, etc.)
Database Name: Enter in the database name that you are connecting to (You can obtain from the MS SQL section of the control panel).
Server: Enter in the server name for the database you are connecting to (You can obtain from the MS SQL section of the control panel).
Port: Enter in the port for the MS SQL server (All of our shared servers and VPS use the default MS SQL port of '1433').
Username (Optional): Enter in the user name for the database you are wanting to connect to (You can obtain from the MySQL section of the control panel).
Password (Optional): Enter in the password to the user name you provided in the 'Username' field.
ColdFusion DataSource: If your website is on a server that has ColdFusion installed then you will have a checkbox for ColdFusion DataSource. When this field is checked then the datasource will be created within ColdFusion as well as the default ODBC service.
Enable CLOB: Allows you to enable CLOB strings.
Enable BLOB: Allows you to enable BLOB strings.
PostgreSQL
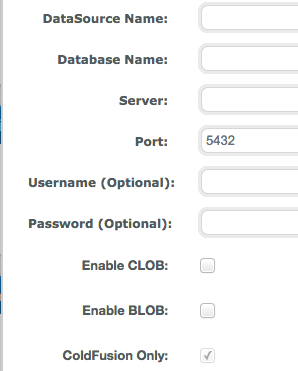
DataSource Name:The DataSource name is the actual name of the DSN that you'll be calling within your websites code (PHP,CF, etc.)
Database Name: Enter in the database name that you are connecting to.
Server: Enter in the server name for the database you are connecting to.
Port: Enter in the port for the PostgreSQL server (defaults to port '5432').
Username (Optional): Enter in the user name for the database you are wanting to connect to.
Password (Optional): Enter in the password to the user name you provided in the 'Username' field.
Enable CLOB: Allows you to enable CLOB strings.
Enable BLOB: Allows you to enable BLOB strings.
Note: This is only an option if the domain is on a ColdFusion server. We do not have any shared PostgreSQL servers so this would be an external connection to a PostgreSQL database.. and not a connection to any of our servers.
Sybase
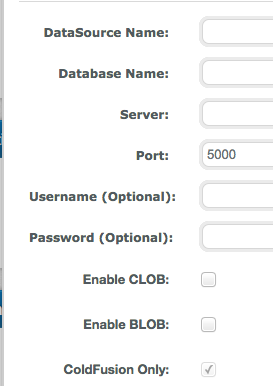
DataSource Name:The DataSource name is the actual name of the DSN that you'll be calling within your websites code (PHP,CF, etc.)
Database Name: Enter in the database name that you are connecting to.
Server: Enter in the server name for the database you are connecting to.
Port: Enter in the port for the Sybase server (defaults to port '5000').
Username (Optional): Enter in the user name for the database you are wanting to connect to.
Password (Optional): Enter in the password to the user name you provided in the 'Username' field.
Enable CLOB: Allows you to enable CLOB strings.
Enable BLOB: Allows you to enable BLOB strings.
Note: This is only an option if the domain is on a ColdFusion server. We do not have any shared PostgreSQL servers so this would be an external connection to a PostgreSQL database.. and not a connection to any of our servers.
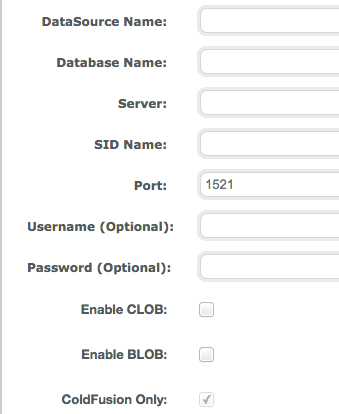
Oracle
DataSource Name:The DataSource name is the actual name of the DSN that you'll be calling within your websites code (PHP,CF, etc.)
Database Name: Enter in the database name that you are connecting to.
Server: Enter in the server name for the database you are connecting to.
SID Name: Enter the SID Name from your Oracle host here.
Port: Enter in the port for the Oracle server (defaults to port '1521').
Username (Optional): Enter in the user name for the database you are wanting to connect to.
Password (Optional): Enter in the password to the user name you provided in the 'Username' field.
Enable CLOB: Allows you to enable CLOB strings.
Enable BLOB: Allows you to enable BLOB strings.
Note: This is only an option if the domain is on a ColdFusion server. We do not have any shared PostgreSQL servers so this would be an external connection to a PostgreSQL database.. and not a connection to any of our servers.
Updating a DSN
- Click on the icon in the control panel labeled 'DataSources (DSNs)' under the Databases section.
- You should now see a list of any existing DSNs (if any). To update a DSN click the pencil icon to the left of the DSN name as shown in the screenshot below:
- You will now be able to update the values for the DSN such as the password if needed... click on the 'Save' button to save any changes you make to a DSN.
- Click on the icon in the control panel labeled 'DataSources (DSNs)' under the Databases section.
- You should now see a list of any existing DSNs (if any). To delete a DSN click on the trash can icon to the right of the DSN as shown in the screenshot below:
- A prompt should appear asking if you want to confirm the deletion of the DSN. Click 'OK' to proceed with the removal or click 'Cancel' to cancel the deletion of the DSN.
Deleting a DSN
