FileZilla FTP Client
From Hostek.com Wiki
Summary
This guide will help you download, install, and set up the widely-used FileZilla FTP software. If you have any questions about any step of this process, please feel free to contact Hostek.com support by clicking here.
Downloading
Picking the right version of FileZilla is rather simple.
- First, we'll start by going to the download page here:
- The next step will depend on what operating system you have on your computer. If it is Windows, click the link under the bold title Windows (64bit). If your operating system is Mac OS, click the link under the bold title Mac OS X.
- Note: For this part of the guide, we'll be assuming that your operating system is Windows. Install and setup should be the extremely similar on Mac OS once FileZilla is downloaded, however.
- Since my computer is Windows, I've clicked the link titled 'FileZilla_3.25.1_win64-setup.exe' and it is now downloaded to my computer. Navigate to the location it was downloaded, then double-click to run the FileZilla installer.
Installing
- For the first step of the FileZilla installer, click 'I agree'.
- Next, click 'Only for me (username)', then click Next >.
- Next, ensure all the boxes in the image below are checked, then click Next >.
- Next, select the location you want to install FileZilla, or leave it at default. Click Next > when you are done.
- Then, choose the name of the Start Menu Folder, or leave it at default. Click Install when ready.
- After ensuring the box 'Start FileZilla now' is checked, click Finish.


Setting Up your First Domain
- Click the button at the top-left of the window labeled 1. in the image below.
- Click on New Site as outlined in the image below.
- Refer to the following image, then the explanation of each labeled box below it.
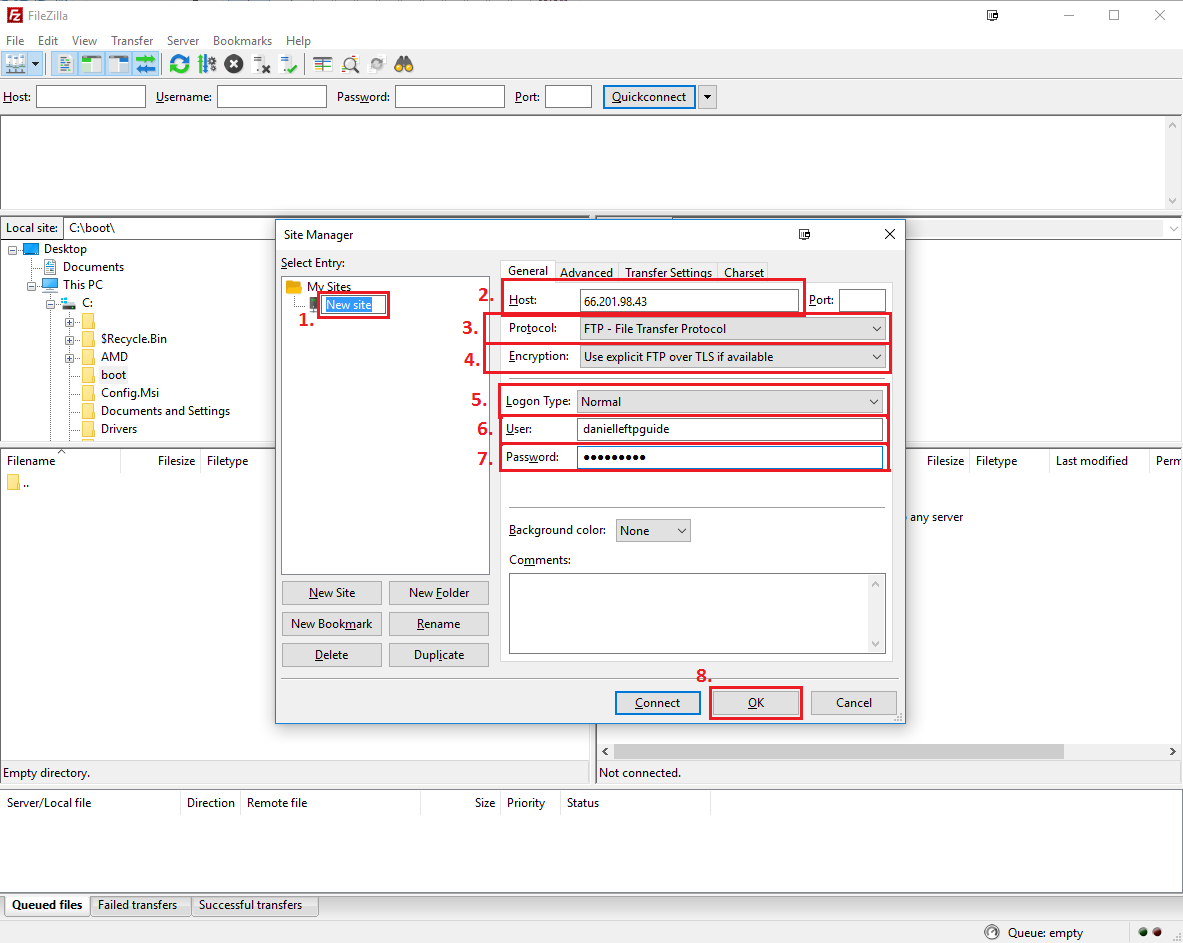
- 1. - This will be the label for your website's FTP connection. Name it whatever you would like.
- 2. - This is the Host IP of your website's FTP. You should be able to find this information in your website's 'New Account' e-mail Hostek.com sent when you registered with us.
- 3. - This is the FTP protocol for your site. Keep it on the default 'FTP - File Transfer Protocol' for now.
- 4. - This is the encryption for your FTP connection. Keep it on the default 'Use explicit FTP over TLS if available' for now.
- 5. - This is how we're going to log into the FTP server. Select 'Normal' from the drop-down.
- 6. - This is the FTP username for your website. You should be able to find this information in your website's 'New Account' e-mail Hostek.com sent when you registered with us.
- 7. - This is the password for your FTP connection. As above, you should be able to find this information in your website's 'New Account' e-mail Hostek.com sent when you registered with us.
- 8. - Once you've done the above, click this button labeled 'OK' to save.
- Click the little arrow in the top-left as shown in the picture below, then click what you labeled your new site.
- You may get a pop-up as seen below. This is just telling you that the FTP connection is secured by encryption. Make sure the box labeled 1. is checked, then click OK.
- You should now be connected to your website via FTP! See the image below for a brief explanation of the different areas inside FileZilla.
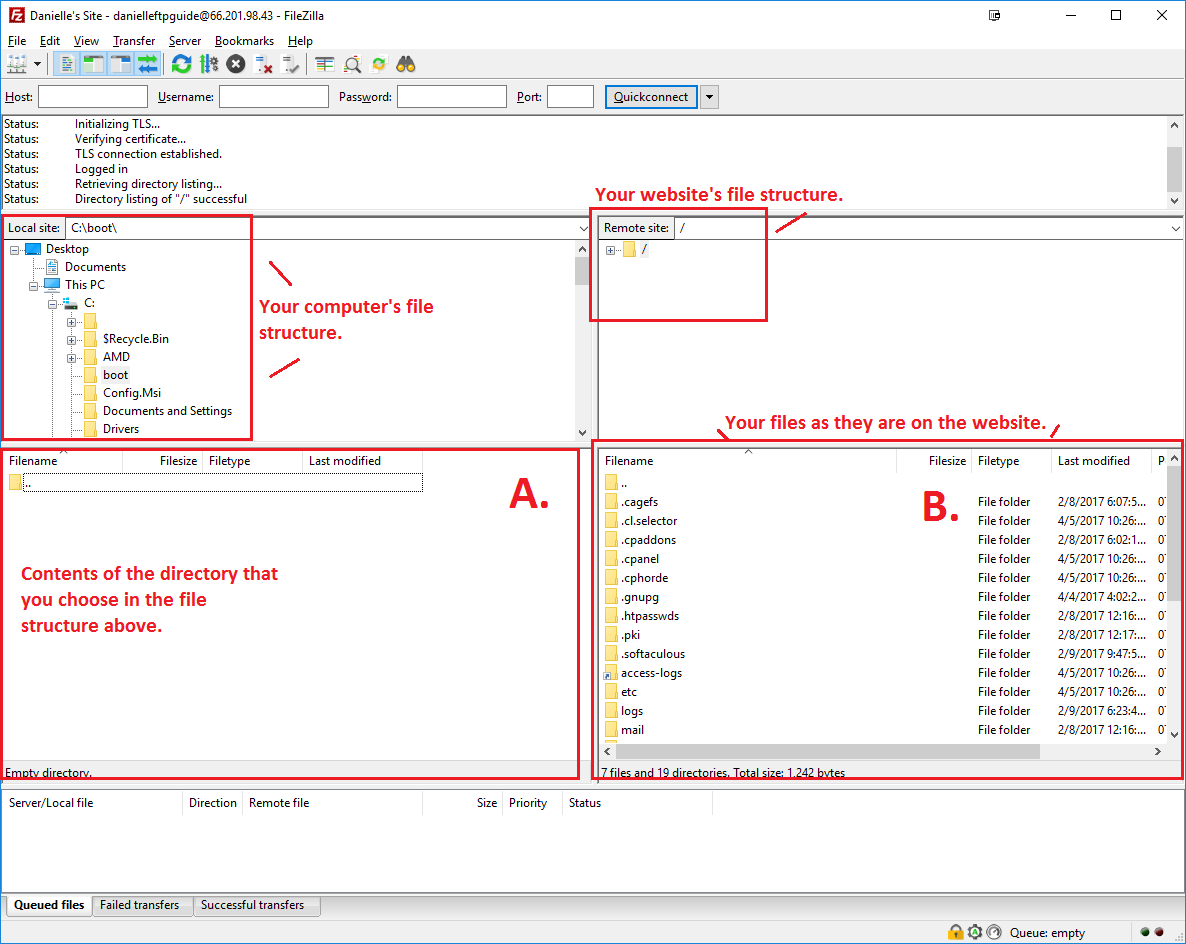
- The box labeled A. is your computer's files. The box labeled B. is your site's files. You may drag and drop from A. to B. to upload files, or drag and drop from B. to A. to download files.
- Use the box above A. to navigate through your computer's files. Use the box above B. to navigate through your site's files.


