Difference between revisions of "Upgrading ColdFusion"
m (→ColdFusion 10 Mandatory Update) |
(→Upgrading ColdFusion 10 to the latest version) |
||
| Line 2: | Line 2: | ||
==Upgrading ColdFusion 10== | ==Upgrading ColdFusion 10== | ||
===Upgrading ColdFusion 10 to the latest version=== | ===Upgrading ColdFusion 10 to the latest version=== | ||
| − | + | In our experience it is most reliable to download the latest cumulative update through ColdFusion Administrator, then manually execute the update from the command line. Follow these steps to apply your ColdFusion 10 updates from the command line on your server: | |
| − | + | ====Step 1 - Ensure Java JRE is in System Path==== | |
| − | + | 1. To check your path first open your system properties by right-clicking your VPS's '''Computer''' icon in '''Windows Explorer''', then clicking '''Propteries'''.<br />[[File:Cf10updates-01.png]]<br /><br /> | |
| − | + | 2. In the window that opens, click the '''Advanced System Settings''' link off to the left.<br />[[File:Cf10updates-02.png]]<br /><br /> | |
| − | + | 3. In the popup that appears, click the '''Environment Variables''' button toward the bottom right.<br />[[File:Cf10updates-03.png]]<br /><br /> | |
| − | + | 4. In the next popup, select the '''Path''' variable under '''System Variables''', then click '''Edit'''.<br />[[File:Cf10updates-04.png]]<br /><br /> | |
| − | + | 5. In the next popup, checked the '''Variable value''' textbox to see if the path to a JRE exists. If not, add a semicolon to the end of the line, followed by the path to your JRE. For example, if your server is using the default Coldfusion 10 JRE, this is what you'd add to the end of the textbox: <pre>;C:\ColdFusion10\jre\</pre><br />[[File:Cf10updates-05.png]]<br /><br /> | |
| − | + | ||
| − | + | ||
| − | + | ||
| − | + | ||
| − | + | ||
| − | + | ||
| − | + | Once you've updated your system's PATH variable, you can click OK on all the popup windows to save your changes. | |
| + | ====Step 2 - Download the Update==== | ||
| + | #Log into ColdFusion Administrator for your server | ||
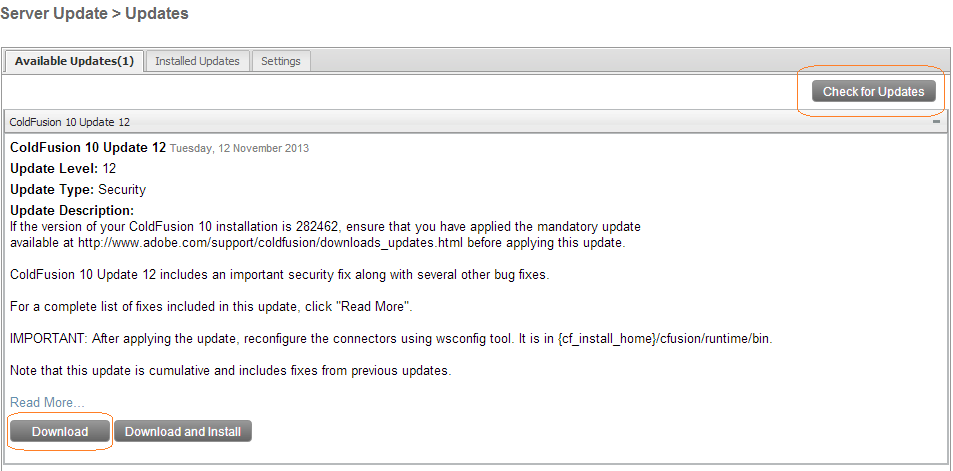
| + | #Navigate to the '''Server Update'''-->'''Updates''' section | ||
| + | ##If you do not see an available update, click the '''Check for Updates''' button | ||
| + | ##If you see an available update, click the '''Download''' button<br />[[File:Cf10updates-06.png]] | ||
| + | #ColdFusion will download the file to '''''<cf_home>''/hf-updates/''' (eg. c:\ColdFusion10\cfusion\hf-updates) | ||
| + | ====Step 3 - Run the Update Installer==== | ||
| + | #Open a command prompt window on your server as administrator. You can do this by right-clicking on the CMD icon in the Start Menu, then choosing "Run As Administrator" | ||
| + | #Navigate to the location where ColdFusion downloaded your update <pre>cd c:\ColdFusion10\cfusion\hf-updates</pre> | ||
| + | #Launch your update via the following command: <pre>java -jar hotfix_0XX.jar</pre> (replace '''0XX''' with the actual update number) | ||
| + | #Your CF update will be launched in a GUI. Just follow the prompts to install the update, and it will take care of the rest. | ||
| + | |||
| + | Once the update has completed, just log into ColdFusion Administrator and go back to the Server Updates section. If it shows the update you applied in the '''Installed Updates''' tab, your ColdFusion installation has been updated successfully. | ||
===Post-Upgrade: Upgrade the IIS connector=== | ===Post-Upgrade: Upgrade the IIS connector=== | ||
Revision as of 00:00, 20 November 2013
Contents
Upgrading ColdFusion 10
Upgrading ColdFusion 10 to the latest version
In our experience it is most reliable to download the latest cumulative update through ColdFusion Administrator, then manually execute the update from the command line. Follow these steps to apply your ColdFusion 10 updates from the command line on your server:
Step 1 - Ensure Java JRE is in System Path
1. To check your path first open your system properties by right-clicking your VPS's Computer icon in Windows Explorer, then clicking Propteries.
2. In the window that opens, click the Advanced System Settings link off to the left.
3. In the popup that appears, click the Environment Variables button toward the bottom right.
4. In the next popup, select the Path variable under System Variables, then click Edit.
;C:\ColdFusion10\jre\

Once you've updated your system's PATH variable, you can click OK on all the popup windows to save your changes.
Step 2 - Download the Update
- Log into ColdFusion Administrator for your server
- Navigate to the Server Update-->Updates section
- If you do not see an available update, click the Check for Updates button
- If you see an available update, click the Download button
- ColdFusion will download the file to <cf_home>/hf-updates/ (eg. c:\ColdFusion10\cfusion\hf-updates)

Step 3 - Run the Update Installer
- Open a command prompt window on your server as administrator. You can do this by right-clicking on the CMD icon in the Start Menu, then choosing "Run As Administrator"
- Navigate to the location where ColdFusion downloaded your update
cd c:\ColdFusion10\cfusion\hf-updates
- Launch your update via the following command:
java -jar hotfix_0XX.jar
(replace 0XX with the actual update number) - Your CF update will be launched in a GUI. Just follow the prompts to install the update, and it will take care of the rest.
Once the update has completed, just log into ColdFusion Administrator and go back to the Server Updates section. If it shows the update you applied in the Installed Updates tab, your ColdFusion installation has been updated successfully.
Post-Upgrade: Upgrade the IIS connector
The ColdFusion to IIS connector must be upgraded after applying a ColdFusion 10 Update. After applying the latest update for ColdFusion 10, perform the following steps:
- Open a command prompt
- Navigate to C:\ColdFusion10\cfusion\runtime\bin:
cd C:\ColdFusion10\cfusion\runtime\bin - Open 'wsconfig.exe', issuing it the upgrade parameter:
.\wsconfig.exe -ws iis -site 0 -upgrade -v
The tool will restart IIS, then you'll be able to continue using ColdFusion.
ColdFusion 10 Mandatory Update
If you happen to have a server on Coldfusion 10 version 282462 or earlier, you will first need to apply the ColdFusion 10 Mandatory Update first. Follow these steps to complete the installation:
- Download the JAR file for the update from Adobe.
- On your server, open a command prompt as Administrator then navigate to the folder containing the update's JAR file.
- Launch the JAR with this command:
java -jar cf10_mdt_updt.jar
- Follow the installer's instructions, and the update will complete in a couple minutes.
Once the mandatory update has been installed, you'll be able to proceed through the update instructions above.