Difference between revisions of "Manage Scheduled Task (Cron Jobs)"
| Line 1: | Line 1: | ||
| − | < | + | ==What is a ColdFusion Scheduled Task?== |
| + | <p>A ''''ColdFusion Scheduled Task'''' allows you to schedule a task to be completed at a specific time or at specific time intervals.</p> | ||
| + | <br /><br /> | ||
| + | Let's go ahead and show how to setup a ColdFusion scheduled task for your domain.</p> | ||
| + | ==How to access ColdFusion scheduled tasks in WCP== | ||
| − | + | We'll share the steps needed to get to the ColdFusion scheduled tasks section below: | |
| − | + | <br /><br /> | |
| − | <br /> | + | |
<ol style="list-style-type: decimal;"> | <ol style="list-style-type: decimal;"> | ||
| + | <li><p>First login to your WCP control panel for the account the domain is under: https://wcp.hostek.com</p> | ||
| + | [[file:wcp_url_secure.png]] | ||
| + | <br /><Br /> | ||
| + | <p>If you have any issues with logging into WCP then please see our tutorials on [[Forgot_WCP_Password|recovering your password]] if necessary</p></li></ol> | ||
| − | |||
| − | |||
| − | |||
| − | |||
<br /> | <br /> | ||
| − | <li><p> | + | <ol start="2" style="list-style-type: decimal;"> |
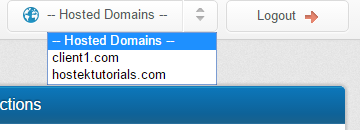
| − | [[ | + | <li><p>Once logged into WCP if you have multiple domains you may need to select the appropriate domain to manage using the ''''Hosted Domains'''' drop-down in the top-right of the page as shown in the screenshot below:</p> |
| − | </li> | + | [[file:wcp_change_domain.png]] |
| + | <br /><br /> | ||
| + | </li></ol> | ||
| − | < | + | <br /> |
| − | + | ||
| − | + | ||
| − | + | ||
| − | + | ||
| − | <li><p> | + | <ol start="3" style="list-style-type: decimal;"> |
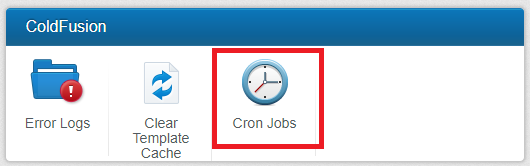
| − | [[ | + | <li><p>Once in the correct domains WCP control panel click on the ''''Cron Jobs'''' icon under the ''''ColdFusion'''' section.</p> |
| − | </ | + | [[file:CronJobsButton.PNG]] |
| − | </ | + | <br /><br /> |
| + | </li></ol> | ||
| + | <br /> | ||
| + | |||
| + | |||
| + | ===Create a new scheduled task=== | ||
| + | <ol> | ||
| + | <li><p>Click the ''''Add'''' button.</p> | ||
| + | [[File:Add_Cron_Job_Button.PNG]] | ||
| + | </li> | ||
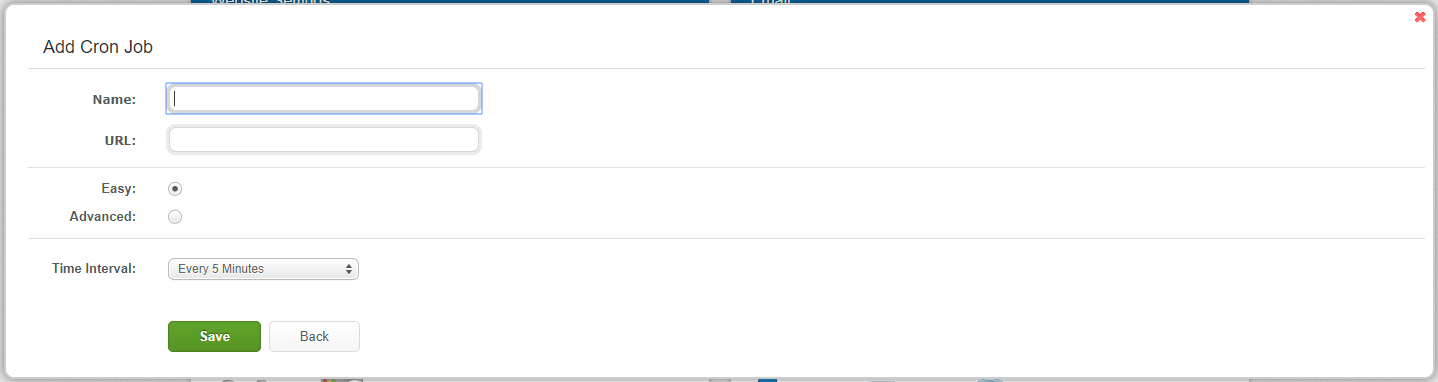
<li><p>You will now enter the specific information for your scheduled task.</p> | <li><p>You will now enter the specific information for your scheduled task.</p> | ||
| − | |||
<ul> | <ul> | ||
<li>''''Name''''</li> | <li>''''Name''''</li> | ||
Enter the name of your task. | Enter the name of your task. | ||
| − | + | ||
<li>''''URL''''</li> | <li>''''URL''''</li> | ||
Enter the URL your task will run. | Enter the URL your task will run. | ||
| − | + | ||
| − | + | ||
<li>''''Easy''''</li> | <li>''''Easy''''</li> | ||
Choose time enterval from drop down. | Choose time enterval from drop down. | ||
| − | + | ||
<li>''''Advanced''''</li> | <li>''''Advanced''''</li> | ||
Allows you to run task at any specific minute, hour, day, month or specific day of the week. | Allows you to run task at any specific minute, hour, day, month or specific day of the week. | ||
| − | |||
</ul> | </ul> | ||
| + | |||
| + | [[File:Add_Cron_Job.PNG]] | ||
| + | |||
| + | |||
<li>''''Save''''</li> | <li>''''Save''''</li> | ||
[[File:SaveButton.PNG]] | [[File:SaveButton.PNG]] | ||
</li> | </li> | ||
| + | |||
| + | ===Edit an existing scheduled task=== | ||
| + | |||
| + | <li><p>Click the ''''pencil'''' icon to the left of the task you wish to edit.</p> | ||
| + | [[File:Edit_Existing_Task.PNG]] | ||
| + | </li> | ||
| + | |||
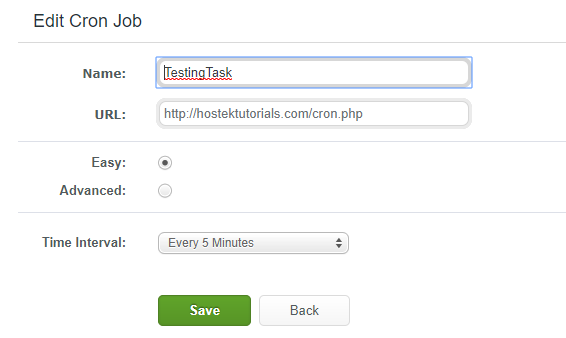
| + | <li><p>You will now be able to edit your exiting task.</p> | ||
| + | <ul> | ||
| + | <li>''''Name''''</li> | ||
| + | Edit the name of your task. | ||
| + | |||
| + | <li>''''URL''''</li> | ||
| + | Edit the URL your task will run. | ||
| + | |||
| + | <li>''''Easy''''</li> | ||
| + | Edit the time interval from drop down. | ||
| + | |||
| + | <li>''''Advanced''''</li> | ||
| + | Allows you to edit the task to any specific minute, hour, day, month or specific day of the week. | ||
| + | |||
| + | [[File:EditTask.PNG]] | ||
| + | |||
| + | <li>''''Save''''</li> | ||
| + | [[File:SaveButton2.PNG]] | ||
| + | </li> | ||
| + | |||
[[Category:WCP (Windows based Control Panel)]] | [[Category:WCP (Windows based Control Panel)]] | ||
Latest revision as of 17:14, 31 July 2017
Contents
What is a ColdFusion Scheduled Task?
A 'ColdFusion Scheduled Task' allows you to schedule a task to be completed at a specific time or at specific time intervals.
Let's go ahead and show how to setup a ColdFusion scheduled task for your domain.</p>
How to access ColdFusion scheduled tasks in WCP
We'll share the steps needed to get to the ColdFusion scheduled tasks section below:
First login to your WCP control panel for the account the domain is under: https://wcp.hostek.com

If you have any issues with logging into WCP then please see our tutorials on recovering your password if necessary
Once logged into WCP if you have multiple domains you may need to select the appropriate domain to manage using the 'Hosted Domains' drop-down in the top-right of the page as shown in the screenshot below:

Once in the correct domains WCP control panel click on the 'Cron Jobs' icon under the 'ColdFusion' section.

Create a new scheduled task
Click the 'Add' button.

You will now enter the specific information for your scheduled task.
- 'Name'
- 'URL'
- 'Easy'
- 'Advanced'
Enter the name of your task.
Enter the URL your task will run.
Choose time enterval from drop down.
Allows you to run task at any specific minute, hour, day, month or specific day of the week.
- 'Save'
Click the 'pencil' icon to the left of the task you wish to edit.

You will now be able to edit your exiting task.
- 'Name'
- 'URL'
- 'Easy'
- 'Advanced'
- 'Save'
Edit the name of your task.
Edit the URL your task will run.
Edit the time interval from drop down.
Allows you to edit the task to any specific minute, hour, day, month or specific day of the week.