Billing - Contacts & Sub-Accounts
Create and manage contacts / sub-accounts via client area
In this tutorial, you'll learn how to manage your sub-accounts within your billing control panel.
Add a Contact / Sub-Account
Login to your account at https://cp.hostek.com
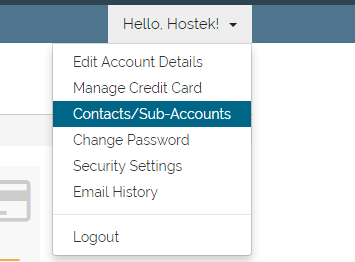
In the far-right of the navigation menu, click the 'Hello, Name!' drop-down, then click 'Contacts/Sub-Accounts'.
Note: 'Name' will be replaced by the first name of the account owner.
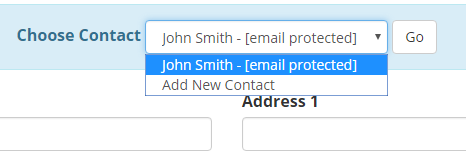
A) If you DO HAVE an existing contact, then you should select 'Add New Contact' from the 'Choose Contact' drop-down menu to create a new contact.
B) If you do NOT currently have any contacts, then this page will default to adding new contacts.
Enter in the new contacts information in each requested field.
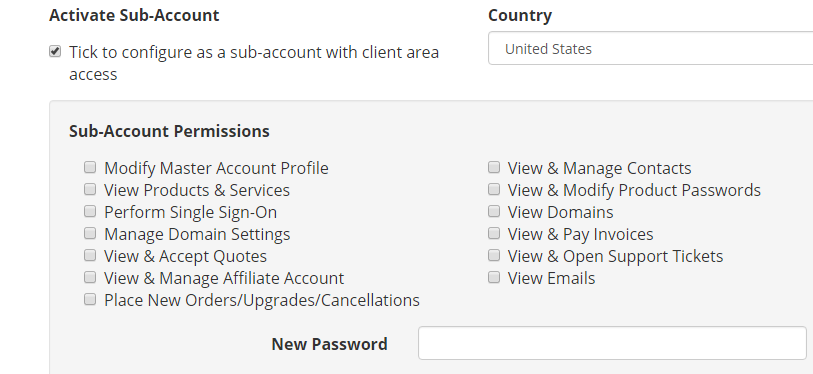
Underneath the contact fields you just filled out you should see a section for 'Activate Sub-Account'. Within this section is a checkbox next to 'Ticket to configure as a sub-account with client area access'.
If you check this checkbox this will enable the contact to be able to login and have specific permissions ( that is controlled by the primary account owner ). With the checkbox checked this enables another section to appear on the form with permissions that you can control for the contact.
Modify Master Account Profile - Enables the contact to have the permissions to update the primary account holders contact information, credit card on file, ect.
View Products & Services - Enables the contact to view active and past products such as hosting packages and add-ons.
Perform Single Sign-On - Enables the contact to automatically login to any available service within the client area such as logging into a control panel for a specific cPanel or Windows based site.
Manage Domain Settings - Enables the contact to be able to view & change nameservers, WHOIS contact information, locking status, ect. for a domain.
View & Accept Quotes - Enables the contact to view any custom quotes provided to the account for new orders.
View & Manage Affiliate Account - Enables the contact to view and manage existing affiliate information ( such as affiliate balance ) and links to provide to potential customers.
Place New Orders/Upgrades/Cancellations - Enables the contact to create new orders such as hosting or add-ons, as well as upgrade existing services or perform a cancellation on an existing service if needed.
View & Manage Contacts - Enables the contact to view all existing contacts on the account and update their information if needed.
View & Modify Product Passwords - Enables the contact to update the password uses for services if the service has the option available.
View Domains - Allows the contact to view all the domains ( existing and previous domains ) on the account.
View & Pay Invoices - Enables the contact to view all current and past invoices on the account and perform payments on invoices if needed.
View & Open Support Tickets - Enables the contact to create support request such as account changes or upgrades that may be needed.
View Emails - Enables the contact to view any automated emails that the billing system has sent. This could be notifications related to invoices, suspension, password resets, ect.
New Password - The password that the new contact will use when logging into the client area.
Now under the 'Email Preferences' section you can select what email notifications the contact will receive:
- General Emails - General Announcements & Password Reminders
- Product Emails - Order Details, Welcome Emails, etc...
- Domain Emails - Renewal Notices, Registration Confirmations, etc...
- Invoice Emails - Invoices & Billing Reminders
- Support Emails - Allow this user to open tickets in your account
- General Emails - General Announcements & Password Reminders
Click the 'Save Changes' button once you have provided the correct information and permissions for the contact.
| Field | Description |
|---|---|
| First Name | The first name of the new contact. |
| Last Name | The last name of the new contact. |
| Company Name | (Optional) Name of the company the contact is associated with. |
| Email Address | The email address of the new contact that will be used for notifications as well as logging into the client area ( if sub-account is enabled for this contact ). |
| Phone Number | The phone number that we ( Hostek ) can reach the new contact in case of emergency and / or notifications. |
| Address 1 | The address for the new contact. |
| Address 2 | ( Optional ) An additional address for the new contact. |
| City | The city of which the new contact owner lives. |
| State/Region | The State / Region of which the new contact lives. |
| Zip Code | The Zip code of the new contact. |
| Country | The Country of which the new contact lives. |
The contact should now be successfully created or updated. If you chose to set up the contact as a sub-account, then you can test the credentials at: https://cp.hostek.com.
To remove a Contact / Sub-Account
Login to your account at https://cp.hostek.com
In the far-right of the navigation menu, click the 'Hello, Name!' drop-down, then click 'Contacts/Sub-Accounts'.
Note: 'Name' will be replaced by the first name of the account owner.
Select the Contact/Sub-Account in question in the 'Choose Contact' drop-down menu, then click 'Go'.
Scroll down to the bottom of the page, and click on the red 'Delete Contact' button.
Note: This will permanently delete the contact/sub-account once done.


