Kindle Fire Email Setup
From Hostek.com Wiki
Contents
Prerequisites
- These are setup instructions for the 2nd Generation of the Kindle Fire.
- To setup up an email account, the Kindle Fire needs an internet connection.
- An active Mail account with Hostek.com (cPanel or SmarterMail)
- Username and Password
Setup
Open Mail Application on your Kindle Fire
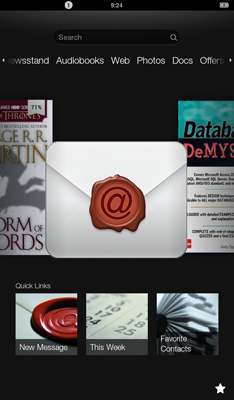
First, open the email application on your Kindle Fire. Find the envelope on your Kindle Fire "Carousel" and open the application.
Select the Email Provider
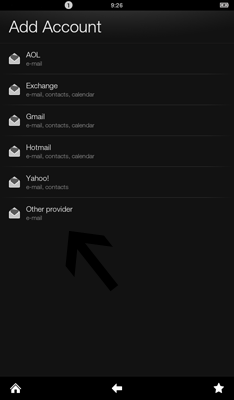
On the next screen, select Other Provider for the email account. If this is the first email account being setup, you will see the screen below. If there is already an account on the Kindle Fire, click Add Account.
Initial Setup of Email Account
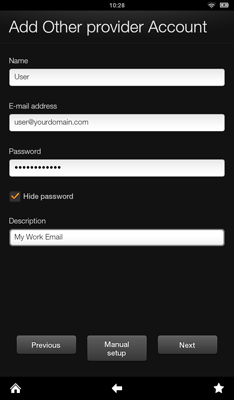
On the next screen, enter the information requested. Name will be your full name. Enter the Email/Password for the account. Give the email account a Description, like Work Email. When finished, Click Manual Setup
Incoming Server Settings
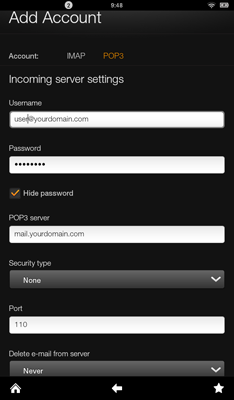
Here you will set the incoming mail server settings.
- For Account, choose IMAP or POP3 (POP3 is the standard setting).
- The Username/Password should have transferred over.
- For the Incoming Server, it will say POP3 server or IMAP server - depending on which account type you went with, you will use your domain name with mail in front of it, like mail.domain.com.
- For Security type, leave as None
- Port will be 110 for POP3 and 143 for IMAP (This will default to the correct port when you change the account type).
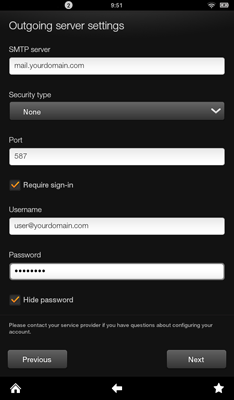
Outgoing Server Setting
Scroll down and you will find the Outgoing Mail Server Settings.
- For SMTP Server, enter mail.yourdomain.com (your domain name in place of "yourdomain.com")
- For Security Type, leave as None
- For Port, you can use 587 (which is a submissive port). If 587 fails, try using 25 or 26 for Outgoing Server Port.
- Leave Require sign-in checked
- Enter Username/Password
- Click Next
Troubleshooting
- Verify that the Username and Password are correct. Uncheck the "Hide Password" option during setup. If it continues to fail, try logging on to your Webmail (by going to mail.yourdomain.com) and accessing it using the same settings. If they do not work, contact your mail administrator about your Username/Password not working.
- If the Username/Password do work, try changing your outgoing server port to 25 or 26.
- If these do not work, there could be a DNS issue. Try using the actual server address, for instance mail13.hostek.com. You can get the exact address from your mail administrator or by accessing the domain's control panel and viewing the mail settings.
