Difference between revisions of "Enabling TLS on Common FTP Software"
(→Enabling TLS on Popular FTP Software) |
(→Enabling TLS on Popular FTP Software) |
||
| Line 132: | Line 132: | ||
#Click 'Advanced', then change the 'Server Type' dropdown to 'FTP/SSL (AUTH SSL)'. | #Click 'Advanced', then change the 'Server Type' dropdown to 'FTP/SSL (AUTH SSL)'. | ||
#Click OK. | #Click OK. | ||
| + | |||
| + | <br /> | ||
| + | |||
| + | ===Core FTP LE=== | ||
| + | |||
| + | #Click File->Connect. | ||
| + | #Enter the following: | ||
| + | #*'''Site Name:''' Choose a name for the connection. | ||
| + | #*'''Host / IP / URL:''' Your server IP.[[#Additional Notes| (?) ]] | ||
| + | #*'''Username:''' Your cPanel username.[[#Additional Notes| (?) ]] | ||
| + | #*'''Password:''' Your cPanel password.[[#Additional Notes| (?) ]] | ||
| + | #*'''Connection:''' AUTH TLS. | ||
| + | #Click Connect. | ||
<br /> | <br /> | ||
Revision as of 16:16, 19 August 2014
Contents
Summary
In today's world with a high magnitude of scripts automatically set to sniff for password data, there is a high demand for always using https on web sites. In the same way, we believe FTPS should be enforced for all FTP transactions.
In this wiki we go through the steps to enable FTPS/TLS on popular and less common FTP clients.
Enabling TLS on Popular FTP Software
FileZilla
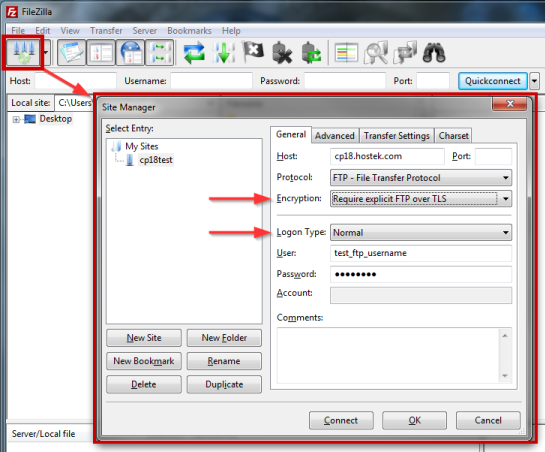
- Open your FileZilla client, then click 'File'->'Site Manager'.
- In the Site Manager window, click 'New Site'.
- Input the FTP server information from your service's welcome e-mail.
- Under 'Encryption', select the 'Require Explicit FTP over TLS' option from the drop-down.
- Change the 'Logon Type' to 'Normal'.
- Enter your FTP account's 'Username' and 'Password'.
- Click 'OK' to save this connection.
- To connect, open 'Site Manager', or click the drop-down arrow next to the 'Site Manager' icon.
Please note: FileZilla does not trust any SSL certificate as valid automatically, even when the SSL certificate was signed by a trusted source (as our certificate is). The developers of FileZilla believed that it is up to individual users to decide if they will accept the certificate.
You can safely accept the the certificate warning message you receive.

WinSCP
- Create a new site in WinSCP, or edit your current one.
- Within the WinSCP Login box, choose 'FTP' as the File Protocol.
- Under 'Encryption:' select 'TLS Explicit encryption'.
- If your site is already set up with WinSCP, click 'Save' to make your changes permanent. Otherwise, simply fill in the information as per your welcome e-mail and click login.
Adobe Dreamweaver
Below is an example FTP over SSL/TLS setup for Dreamweaver version 6.0 and above. Dreamweaver versions prior to CS5.5 do not allow for secure FTP. If you are in this situation, you will be required to use an external FTP program such as FileZilla.

FireFTP
- Open up Firefox and click on Tools > FireFTP
- Click on the "Main" tab. Set up your FTP connection as usual:
- Next, click on the Connection tab. Select the "Security" drop-down and then click "Auth TLS".
SmartFTP
- Click File > "New Connection"
- Set the "Protocol" Field to "FTPS (Explicit)"
- Fill in the following fields:
- Click 'OK' to connect.
CyberDuck
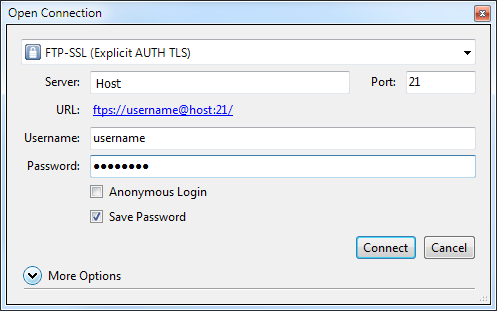
On the “Open Connection” dialog, select the “FTP-SSL (Explicit AUTH TLS)” option. See the image below:

CuteFTP
- On the main menu, click File > New > FTPS (SSL) Site.
- Under the 'General' tab, enter the following:
- Click the 'Type' tab at the top when the above information has been filled in.
- Select 'FTP with TLS/SSL (AUTH TLS - Explicit)' on the 'Protocol Type' drop-down. Leave the rest of the information as default.
- Click 'Connect'. When prompted, accept the SSL certificate.
FlashFXP
- Click 'Sites' > 'Site Manager'
- Click 'New Site' at the bottom left of the new window.
- Choose a name for your site and click 'OK'.
- Under 'Connection Type:' select 'FTP using Explicit SSL (Auth TLS)'.
- In the 'Address' box, type the URL of your site or the IP of the server (either will work).
- Enter the following:
- Click 'Apply', then 'Connect'.
WISE-FTP
- Click File > Connect.
- Click 'New Site' at the top-left.
- Any other information is optional.
WS_FTP PRO
New Connections:
- Click 'Connections' > 'New Connection...'
- Choose a name for the connection.
- Under 'Connection Type:', select 'FTP/SSL (AUTH SSL)'.
- In the 'Server Address:' field, enter in the URL of your site or the IP of the server. (?)
- Username: Your cPanel username. (?)
- Password: Your cPanel password. (?)
- Click Finish.
Existing Connections:
- Click 'Connections' > 'Site Manager'.
- Click 'Edit' next to the site you would like to modify.
- Click 'Advanced', then change the 'Server Type' dropdown to 'FTP/SSL (AUTH SSL)'.
- Click OK.
Core FTP LE
- Click File->Connect.
- Enter the following:
- Click Connect.
Transmit
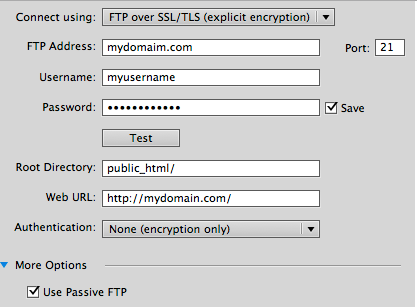
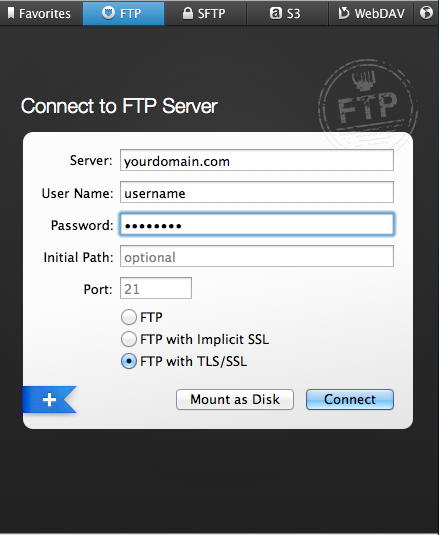
On the “FTP” tab, enter in the following:

Additional Notes
Server information can be found in your Hostek.com welcome e-mail that you receive upon purchasing a service with Hostek. If you are missing this e-mail or any log-in information, please submit a ticket via https://support.hostek.com and we'd be glad to send it once more.