Difference between revisions of "IPhone"
(→iphone POP3 setup) |
(→iphone IMAP Setup) |
||
| Line 64: | Line 64: | ||
*After verification you will be brought to the screen in (Fig 1-2), tap '''Save''' in the upper right corner to complete email setup for IMAP. | *After verification you will be brought to the screen in (Fig 1-2), tap '''Save''' in the upper right corner to complete email setup for IMAP. | ||
[[File:Done.jpg|200px|thumb|left|Fig 1-1]]<br clear=all> | [[File:Done.jpg|200px|thumb|left|Fig 1-1]]<br clear=all> | ||
| + | |||
| + | ==How to set up the iPhone so that it stores sent items on the server== | ||
| + | |||
| + | '''Note:''' You must be using IMAP to use this setting. | ||
| + | |||
| + | #Click Settings | ||
| + | #Click Mail, Contact, Calendars | ||
| + | #Select the Mail account you want to change | ||
| + | #Click on Account Info | ||
| + | #Scroll down to Advanced | ||
| + | #You will now see a screen that says '''Advanced'''. In this screen is a section called '''Mailbox Behaviours''' | ||
| + | #Click on the Sent Mailbox button. | ||
| + | #This will now display two sections. '''On My Iphone''' and '''On the server'''. | ||
| + | #In the section '''On the server''' should be a list of all your mailboxes. | ||
| + | #scroll down to the Sent Items box on the mail server and select the Sent Items. | ||
| + | #When you send an email from your iphone, a copy will be passed to your mail server. | ||
=iphone POP3 setup= | =iphone POP3 setup= | ||
Revision as of 15:12, 30 December 2013
Contents
iphone Email Setup
Found in this article are the steps needed for the iPhone, the iPod, and theiPad mail setup for hostek.com MailServers.
- NOTE: In this tutorial, we are using the example domains within the images. Be sure to replace your domain and email information within the proper fields.
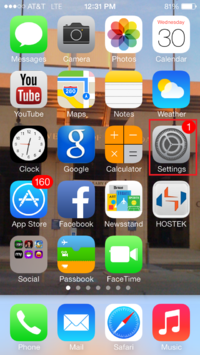
- Tap on "Settings" icon (Fig 1).
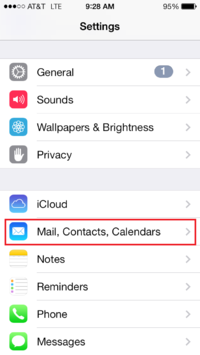
- Tap on the menu item of Mail, Contacts, Calendar. (Fig 2)
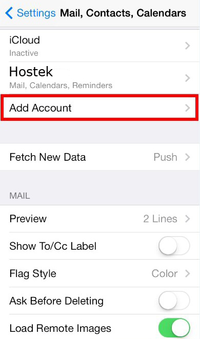
- Tap on "Add Account" (Fig 3)
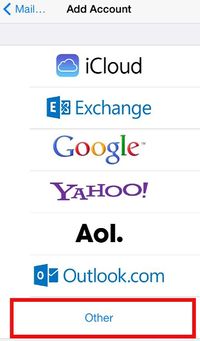
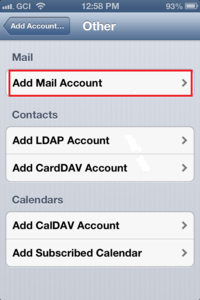
- You will see a list of email accounts types, tap on "Other" at the bottom of the list. (Fig 4)
- If you have an existing account, you will click on Add New Account, again. If you do not have an existing email account, the New Account Screen should appear. (Fig 5)
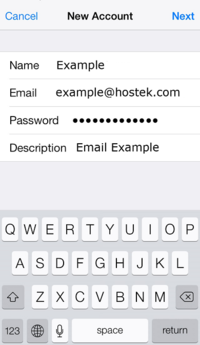
- Complete the fields as follows: (Fig 6)
- Name: The name you want people to see when you send them email messages. Example; John or Joan Smith
- Address: Your full email address. Example; user@your_domain.com
- Password: Your email account password. (Case-sensitive)
- Description: How you want the account to show on the list of email accounts. Example; hostek.com account
- Tap "Next" in the upper right corner to advance to the detailed account information screen.
If setting up IMAP please click the following link IMAP Setup
With IMAP setup there is no need to download the email when viewing email from multiple computers/devices, this is easier to identify unread emails.
If setting up POP3 please click the following link POP3 Setup
With POP3 the email is downloaded from the server to each computer/device.
iphone IMAP Setup
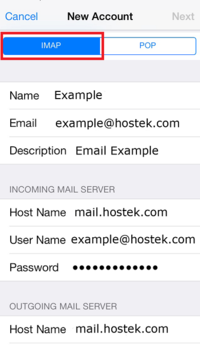
- Ensure IMAP is selected at the top left. (Fig 1-1)
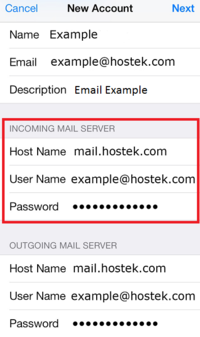
- Scroll down and Under Incoming Mail Server, enter the following:
- Host Name: Enter the mail server's name (ex. mail1.hostek.com)
- For Windows Hosting customers, open WCP, then click on the Webmail icon. The "Pre-propagation Webmail URL" contains the mail server hostname. For example, "https://mail10.hostek.com/Login.aspx" should only be entered as "mail10.hostek.com".
- For Linux Hosting customers, open cPanel, then click on Email Accounts. Click the More dropdown menu next to email user, then Configure Email Client.
- Username: Enter the full email address.
- Password: Enter your email account password (CaSe Sensitive)
- Host Name: Enter the mail server's name (ex. mail1.hostek.com)
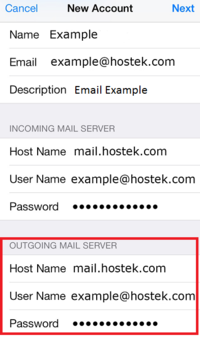
- Continue scrolling down and under Outgoing Mail Server, complete the following:
- Host Name: Enter the mail server's name (ex. mail1.hostek.com)
- For Windows Hosting customers, open WCP, then click on the Webmail icon. The "Pre-propagation Webmail URL" contains the mail server hostname. For example, "https://mail10.hostek.com/Login.aspx" should only be entered as "mail10.hostek.com".
- For Linux Hosting customers, open cPanel, then click on Email Accounts. Click the More dropdown menu next to email user, then Configure Email Client.
- Username: Enter the full email address.
- Password: Enter your email account password (CaSe Sensitive)
- Host Name: Enter the mail server's name (ex. mail1.hostek.com)
- Tap Next in the upper right corner, the phone will verify your information.
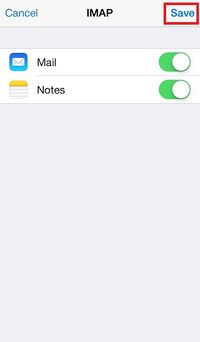
- After verification you will be brought to the screen in (Fig 1-2), tap Save in the upper right corner to complete email setup for IMAP.
How to set up the iPhone so that it stores sent items on the server
Note: You must be using IMAP to use this setting.
- Click Settings
- Click Mail, Contact, Calendars
- Select the Mail account you want to change
- Click on Account Info
- Scroll down to Advanced
- You will now see a screen that says Advanced. In this screen is a section called Mailbox Behaviours
- Click on the Sent Mailbox button.
- This will now display two sections. On My Iphone and On the server.
- In the section On the server should be a list of all your mailboxes.
- scroll down to the Sent Items box on the mail server and select the Sent Items.
- When you send an email from your iphone, a copy will be passed to your mail server.
iphone POP3 setup
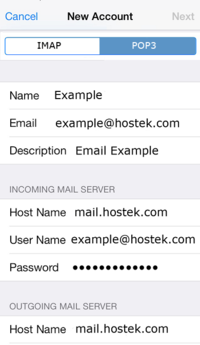
- Ensure POP3 is selected at the top left. (Fig 2-1)
- Scroll down and Under Incoming Mail Server, enter the following:
- Host Name: Enter the mail server's name (ex. mail1.hostek.com)
- For Windows Hosting customers, open WCP, then click on the Webmail icon. The "Pre-propagation Webmail URL" contains the mail server hostname. For example, "https://mail10.hostek.com/Login.aspx" should only be entered as "mail10.hostek.com".
- For Linux Hosting customers, open cPanel, then click on Email Accounts. Click the More dropdown menu next to email user, then Configure Email Client.
- Username: Enter the full email address.
- Password: Enter your email account password (CaSe Sensitive)
- Host Name: Enter the mail server's name (ex. mail1.hostek.com)
- Continue scrolling down and under Outgoing Mail Server, complete the following:
- Host Name: Enter the mail server's name (ex. mail1.hostek.com)
- For Windows Hosting customers, open WCP, then click on the Webmail icon. The "Pre-propagation Webmail URL" contains the mail server hostname. For example, "https://mail10.hostek.com/Login.aspx" should only be entered as "mail10.hostek.com".
- For Linux Hosting customers, open cPanel, then click on Email Accounts. Click the More dropdown menu next to email user, then Configure Email Client.
- Username: Enter the full email address.
- Password: Enter your email account password (CaSe Sensitive)
- Host Name: Enter the mail server's name (ex. mail1.hostek.com)
- To complete setup tap Next in the upper right corner, the phone will verify your information and setup is complete.
iPhone / iPod App for Control Panel
We have an iPhone App for the WCP (Windows Control Panel). You can review and download the app at http://itunes.apple.com/us/app/hostek/id497702422?ls=1&mt=8
iPhone / iPod App for Control Panel for Resellers
We have created a white label version of our iPhone App for the WCP for our Resellers. The white label app is called MochaPanel and can be branded by a reseller to have the reseller logo. The MochaPanel version for Resellers and Reseller customers can be found at http://itunes.apple.com/us/app/mochapanel/id503347627?ls=1&mt=8
iPhone Calendar sync with SmarterMail
NOTE: hostek.com is used in this example, so you will need to replace hostek.com with your domain.
On your iPhone do the following:
- Go to Settings
- Go to Mail, Contact, Calendars
- Go to Add Account...
- Select Other
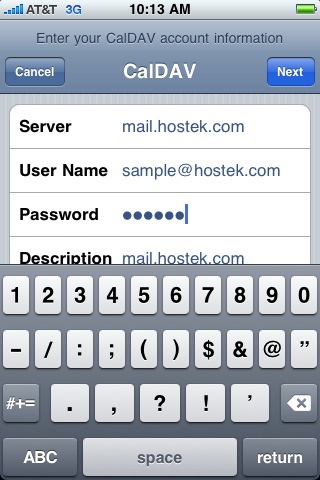
- Select Add CalDAV Account
- Server: mail.hostek.com/webdav (NOTE: The /webdav part will disappear after you tap the User Name field)
- User Name: enter your full email address (see screen shot for example)
- Password: enter your password for this email address
- Description: Leave or change as desired
- Select Next (NOTE: You will get a message about the certificate not being verified. Just accept the certificate).
- That's it. You should get a message it verified the account.
