Difference between revisions of "IPhone"
| (47 intermediate revisions by 7 users not shown) | |||
| Line 1: | Line 1: | ||
| − | + | = Setting up e-mail on your iPhone with Hostek.com = | |
| − | + | ||
| − | + | <!--- <iframe width="560" height="315" src="https://www.youtube.com/embed/s22J2yBotDg" frameborder="0" allowfullscreen></iframe> ---> | |
| + | <br> | ||
| − | + | In this tutorial we'll be showing how to setup e-mail accounts on your iPhone along with ensuring the settings for the incoming and outgoing server are correct. | |
| − | + | <br /> | |
| − | + | == Adding Mail Account: == | |
| − | + | Let's show how to first add the mail account to your iPhone. We'll then show how to ensure its configuration settings are correct. | |
| − | + | # On your iPhone click on the ''''''Settings'''''' icon (looks like a gear symbol). | |
| − | + | <br /> | |
| + | [[Image:settings_icon.png|alt=Click on the 'Settings' icon]] | ||
| + | ----- | ||
| − | + | <br /><br /> | |
| + | <ol start="2" style="list-style-type: decimal;"> | ||
| + | <li>Then scroll and select the option for ''''''Mail''''''.</li></ol> | ||
| − | + | <br /> | |
| − | + | [[Image:iphone_mail_settings.png|alt=Select the 'Mail' option]] | |
| − | |||
| + | ----- | ||
| + | <br /> | ||
| + | <ol start="3" style="list-style-type: decimal;"> | ||
| + | <li>You should now click on ''''Accounts'''' to go into the different available mail account options.</li></ol> | ||
| + | <br /> | ||
| + | [[Image:mail_Accounts.png|alt=Accounts]] | ||
| + | <br /> | ||
| − | + | <ol start="4" style="list-style-type: decimal;"> | |
| + | <li>You should now see a list of existing accounts ( if any ). Click ''''''Add Account''''''.</li></ol> | ||
| + | <br /> | ||
| + | [[Image:Add_Account.png|frame|none|alt=Select 'Add Account']] | ||
| − | |||
| − | - | + | ----- |
| − | + | <br /> | |
| − | - | + | <ol start="5" style="list-style-type: decimal;"> |
| + | <li>Now choose the option for 'Other'.</li></ol> | ||
| + | <br /> | ||
| + | [[Image:choose_other_iphone.png|alt=Choose 'Other']] | ||
| + | <br /> | ||
| + | <br /> | ||
| + | ----- | ||
| + | <br /> | ||
| − | [[ | + | <ol start="6" style="list-style-type: decimal;"> |
| + | <li>For the account type choose 'Add Mail Account'.</li></ol> | ||
| + | <br /> | ||
| + | [[Image:add_mail_account.png|alt=Choose 'Add Mail Account']] | ||
| + | <br /> | ||
| + | <br /> | ||
| + | ----- | ||
| + | <br /> | ||
| + | <ol start="7" style="list-style-type: decimal;"> | ||
| + | <li>Now enter in the account information including:</li></ol> | ||
| + | <br /> | ||
| + | * '''''Name''''': ''The name recipients see as the 'sender' when you send them mail. Also known as the 'Display Name'.'' | ||
| + | * '''''Email''''': ''The e-mail user you are trying to connect your mail to your iPhone with.'' | ||
| + | * '''''Password''''': ''The password used for the e-mail user your connecting to your iPhone with.'' | ||
| + | * '''''Description''''': ''The name that you see for your mail account when you go to the 'Mail' application on your phone.'' | ||
| + | <br /> | ||
| + | [[Image:account_info.png|alt=Enter Account Information]] | ||
| + | <br /><br /> | ||
| + | ----- | ||
| + | <br /> | ||
| + | <ol start="8" style="list-style-type: decimal;"> | ||
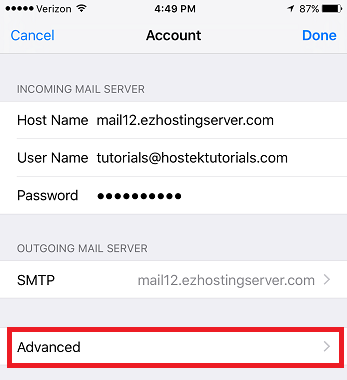
| + | <li>Click 'Next', then enter in the specific incoming and outgoing server settings for the e-mail user.</li></ol> | ||
| + | <br /> | ||
| + | * Please see our separate WIKI articles for what hostname you should use. | ||
| + | ** [[E-Mail_Configuration_(Windows_Environment)#Hostname|Windows SmarterMail Environment]] | ||
| + | ** [[E-Mail_Configuration_(Linux/cPanel_Environment)|Linux/cPanel Environment]]. | ||
| + | * Enter in the full e-mail user address such as tutorials@hostektutorials.com for each of the ''''''User Name'''''' fields. | ||
| + | * Double Check that you entered the correct password into each of the ''''''Password'''''' fields. | ||
| + | <br /> | ||
| + | [[Image:mail_account_credentials.png|alt=Set the correct account credentials]] | ||
| − | + | <br /> | |
| + | ----- | ||
| + | <br /> | ||
| − | - | + | <ol start="9" style="list-style-type: decimal;"> |
| + | <li>Once you click 'Next' the mail account should then be added.</li></ol> | ||
| − | + | '''Note:''' ''If it takes a minute to add and this says it could not connect continue through steps as it automatically attempts connecting with SSL enabled and you may just need to set it to set this mail account to use non-ssl settings for the hostname you're using with your e-mail account.'' <br /><br /> Go back to the 'Mail Accounts' section of the settings and proceed to step 9. | |
| − | - | + | <br /> |
| + | ----- | ||
| + | <br /> | ||
| + | <ol start="10" style="list-style-type: decimal;"> | ||
| + | <li>Now click on the mail account you just added so we can edit the settings of that account.</li></ol> | ||
| + | <br /> | ||
| + | [[Image:select_account.png|alt=Choose newly created account]] | ||
| + | <br /> | ||
| + | ----- | ||
| + | <br /> | ||
| + | <ol start="11" style="list-style-type: decimal;"> | ||
| + | <li>Choose the account again.</li></ol> | ||
| − | + | '''Note:''' ''Make sure that the 'Mail' setting is enabled on this page.'' | |
| + | <br /> | ||
| + | [[Image:select_account2.png|alt=Choose the account again]] | ||
| + | <br /> | ||
| + | ----- | ||
| + | <br /> | ||
| + | ==Outgoing Advanced Settings== | ||
| + | <br /> | ||
| + | <ol start="12" style="list-style-type: decimal;"> | ||
| + | <li>Now that we are in the settings for this user account click the option for 'SMTP' under the outgoing mail server section.</li></ol> | ||
| + | <br /> | ||
| + | [[Image:iphone_smtp_settings.png|alt=Select to edit the SMTP settings]] | ||
| − | |||
| − | + | ----- | |
| + | <br /> | ||
| + | <ol start="13" style="list-style-type: decimal;"> | ||
| + | <li>We can now edit the outgoing server settings. By default 'SSL' is enabled. We will provide the settings to use below for '''''SSL''''' and '''''non-SSL'''''.</li></ol> | ||
| − | + | ===Non-SSL (standard):=== | |
| + | * Please see our separate WIKI articles for what hostname you should use. | ||
| + | ** [[E-Mail_Configuration_(Windows_Environment)#Hostname|Windows SmarterMail Environment]] | ||
| + | ** [[E-Mail_Configuration_(Linux/cPanel_Environment)|Linux/cPanel Environment]]. | ||
| + | * '''''User Name''''': ''The e-mail user your authenticating as (The address your setting your mail up for).'' | ||
| + | * '''''Password''''': ''The password to the e-mail user your authenticating as.'' | ||
| + | * '''''Use SSL''''': ''Turn OFF'' | ||
| + | * '''''Authentication''''': Choose ''''''Password'''''' as the authentication type. | ||
| + | * '''''Server Port''''': ''25, 26, or 587 (Port 25 is commonly blocked by ISPs due to spam issues. Not recommended.)'' | ||
| + | [[Image:iphone_outgoing_settings.png|alt=Update SMTP settings]] | ||
| − | + | ===SSL (Secure):=== | |
| − | [[ | + | * Please see our separate WIKI articles for what hostname you should use. |
| + | ** [[E-Mail_Configuration_(Windows_Environment)#Hostname|Windows SmarterMail Environment]] | ||
| + | ** [[E-Mail_Configuration_(Linux/cPanel_Environment)|Linux/cPanel Environment]]. | ||
| + | * '''''User Name''''': ''The e-mail user your authenticating as (The address your setting your mail up for).'' | ||
| + | * '''''Password''''': ''The password to the e-mail user your authenticating as.'' | ||
| + | * '''''Use SSL''''': ''Turn ON'' | ||
| + | * '''''Authentication''''': Choose ''''''Password'''''' as the authentication type. | ||
| + | * '''''Server Port''''': ''465'' | ||
| + | [[Image:iphone_outgoing_settings_ssl.png|alt=Update SMTP settings]] | ||
| − | + | Click 'Done' once you enter the correct SMTP information. | |
| − | |||
| + | ----- | ||
| − | + | ==Incoming Advanced Settings== | |
| + | <br /> | ||
| + | <ol start="14" style="list-style-type: decimal;"> | ||
| + | <li>Now that we've updated the SMTP settings go back to the ''''''Account Settings'''''' and click ''''''Advanced'''''' so we can update the incoming settings.</li></ol> | ||
| + | <br /> | ||
| + | [[Image:advanced_option.png|alt=Select 'Advanced' option]] | ||
| − | |||
| − | + | ----- | |
| + | <br /> | ||
| + | <ol start="15" style="list-style-type: decimal;"> | ||
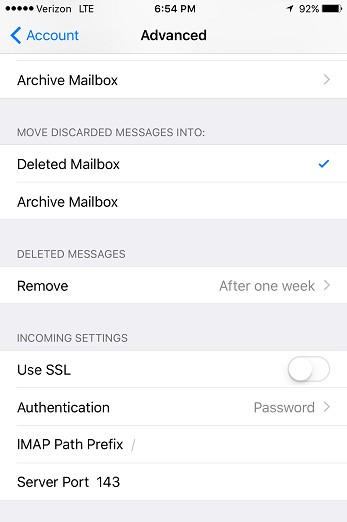
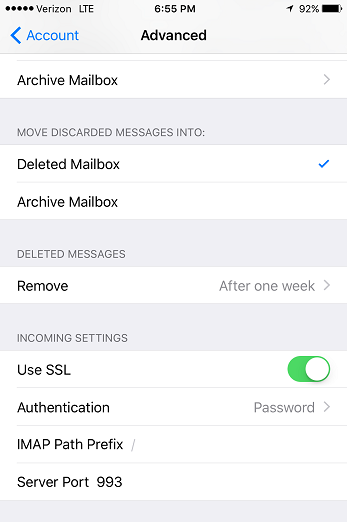
| + | <li>We can now edit the incoming server settings. By default 'SSL' is enabled. We will provide the settings to use below for '''''SSL''''' and '''''non-SSL'''''.</li></ol> | ||
| − | + | ===Non-SSL (Standard): === | |
| − | + | * '''''Use SSL''''': ''Turn OFF'' | |
| − | + | * '''''Authentication''''': Choose ''''''Password'''''' as the authentication type. | |
| + | * '''''POP Server Port''''': ''110'' | ||
| + | * '''''IMAP Server Port''''': ''143'' | ||
| + | [[Image:iphone_incoming_settings.png|alt=Update Incoming Settings.]] | ||
| + | ===SSL (Secure): === | ||
| + | * '''''Use SSL''''': ''Turn ON'' | ||
| + | * '''''Authentication''''': Choose ''''''Password'''''' as the authentication type. | ||
| + | * '''''POP Server Port''''': ''995'' | ||
| + | * '''''IMAP Server Port''''': ''993'' | ||
| + | [[Image:iphone_incoming_settings_ssl.png|alt=Update Incoming Settings]] | ||
| − | |||
| − | + | ----- | |
| + | <br /> | ||
| + | <ol start="16" style="list-style-type: decimal;"> | ||
| + | <li>click 'Done' and you should be all set. You should now be able to send and receive mail using the 'Mail' application. You should see the new email account in the list of active email accounts ( It will show up under the description name you provided earlier ).</li></ol> | ||
| − | |||
| − | |||
| − | + | = iPhone Calendar Sync with SmarterMail = | |
| − | + | ||
| − | + | ||
| − | + | ||
| − | + | ||
| − | + | ||
| − | + | ||
| − | + | ||
| − | + | ||
| − | + | ||
| − | + | ||
| − | + | ||
| − | + | ||
| − | + | ||
| − | + | ||
| − | + | ||
| − | + | ||
| − | + | ||
| − | + | ||
| − | + | ||
| − | + | ||
| − | + | ||
| − | + | ||
| − | + | ||
| − | + | ||
| − | + | ||
| − | + | ||
| − | + | ||
| − | + | ||
| − | + | ||
| − | + | ||
| − | + | ||
| − | + | ||
| − | + | ||
NOTE: hostek.com is used in this example, so you will need to replace hostek.com with your domain. | NOTE: hostek.com is used in this example, so you will need to replace hostek.com with your domain. | ||
| Line 145: | Line 220: | ||
# That's it. You should get a message it verified the account. | # That's it. You should get a message it verified the account. | ||
[[File:Iphone-calendar-sync.jpg]] | [[File:Iphone-calendar-sync.jpg]] | ||
| + | |||
| + | |||
| + | |||
| + | =How to set up the iPhone so that it stores sent items on the server= | ||
| + | |||
| + | '''Note:''' You must be using IMAP to use this setting. | ||
| + | |||
| + | #Click Settings | ||
| + | #Click Mail | ||
| + | #Click "Accounts" | ||
| + | #Select the Mail account you want to change | ||
| + | #Select 'Account' again. | ||
| + | #Scroll down and click on 'Advanced'. | ||
| + | #You will now see a screen that says '''Advanced'''. In this screen is a section called '''Mailbox Behaviours'''. | ||
| + | #Click on the Sent Mailbox button. | ||
| + | #This will now display two sections. '''On My Iphone''' and '''On the server'''. | ||
| + | #In the section '''On the server''' should be a list of all your mailboxes. | ||
| + | #scroll down to the Sent Items box on the mail server and select the Sent Items. | ||
| + | #When you send an email from your iphone, a copy will be passed to your mail server in the inbox you just selected. | ||
| + | |||
[[Category: Configuring-Email-Clients]] | [[Category: Configuring-Email-Clients]] | ||
[[category:CalDAV]] | [[category:CalDAV]] | ||
[[Category: iPhone]] | [[Category: iPhone]] | ||
| + | [[Category: iOS]] | ||
Latest revision as of 18:43, 20 July 2017
Contents
Setting up e-mail on your iPhone with Hostek.com
In this tutorial we'll be showing how to setup e-mail accounts on your iPhone along with ensuring the settings for the incoming and outgoing server are correct.
Adding Mail Account:
Let's show how to first add the mail account to your iPhone. We'll then show how to ensure its configuration settings are correct.
- On your iPhone click on the 'Settings' icon (looks like a gear symbol).
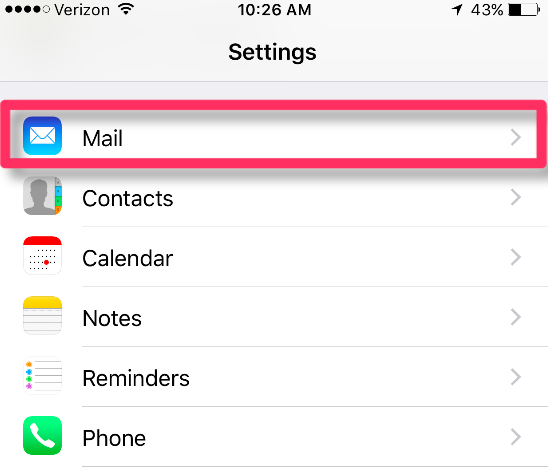
- Then scroll and select the option for 'Mail'.
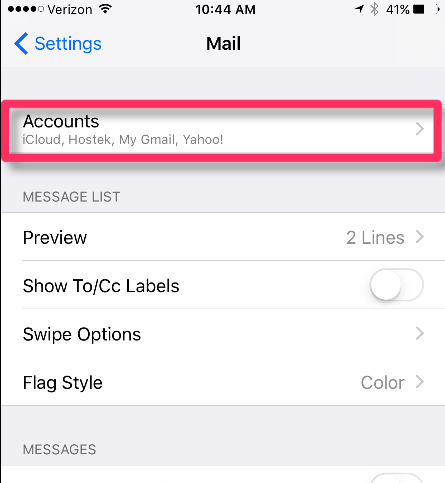
- You should now click on 'Accounts' to go into the different available mail account options.
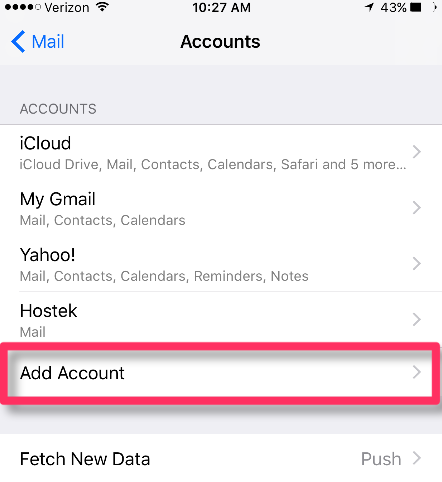
- You should now see a list of existing accounts ( if any ). Click 'Add Account'.
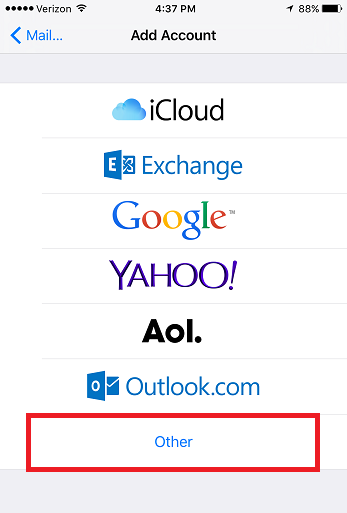
- Now choose the option for 'Other'.
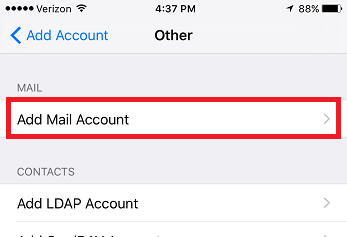
- For the account type choose 'Add Mail Account'.
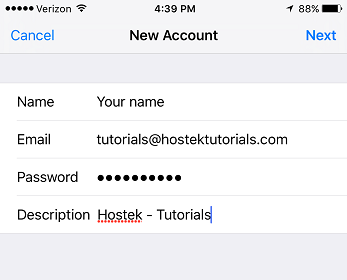
- Now enter in the account information including:
- Name: The name recipients see as the 'sender' when you send them mail. Also known as the 'Display Name'.
- Email: The e-mail user you are trying to connect your mail to your iPhone with.
- Password: The password used for the e-mail user your connecting to your iPhone with.
- Description: The name that you see for your mail account when you go to the 'Mail' application on your phone.
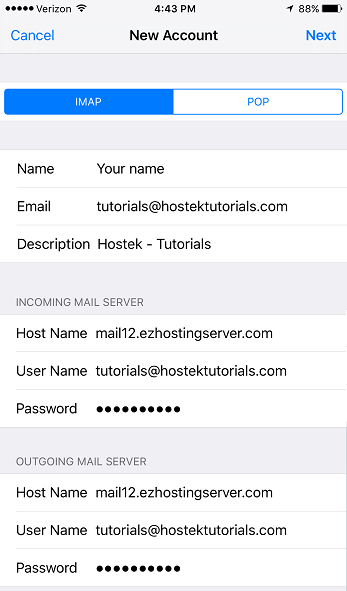
- Click 'Next', then enter in the specific incoming and outgoing server settings for the e-mail user.
- Please see our separate WIKI articles for what hostname you should use.
- Enter in the full e-mail user address such as tutorials@hostektutorials.com for each of the 'User Name' fields.
- Double Check that you entered the correct password into each of the 'Password' fields.
- Once you click 'Next' the mail account should then be added.
Note: If it takes a minute to add and this says it could not connect continue through steps as it automatically attempts connecting with SSL enabled and you may just need to set it to set this mail account to use non-ssl settings for the hostname you're using with your e-mail account.
Go back to the 'Mail Accounts' section of the settings and proceed to step 9.
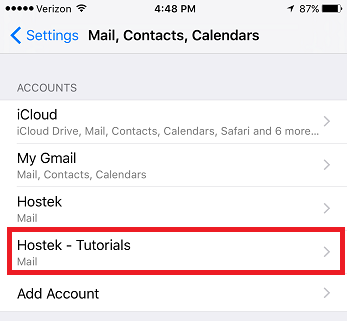
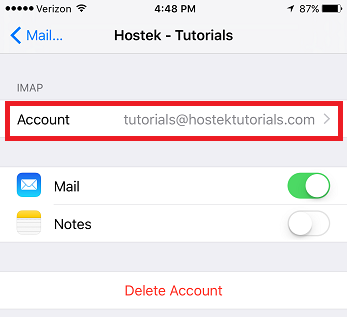
- Now click on the mail account you just added so we can edit the settings of that account.
- Choose the account again.
Note: Make sure that the 'Mail' setting is enabled on this page.
Outgoing Advanced Settings
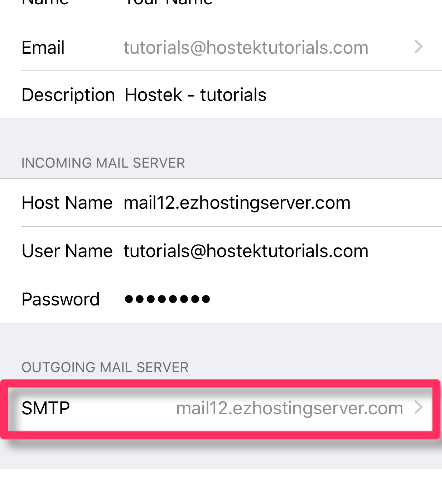
- Now that we are in the settings for this user account click the option for 'SMTP' under the outgoing mail server section.
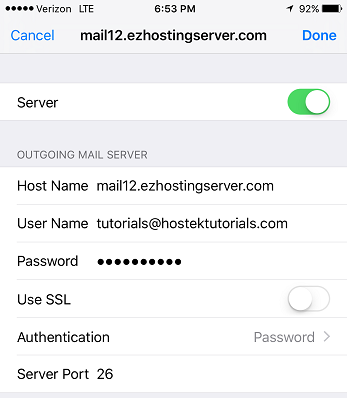
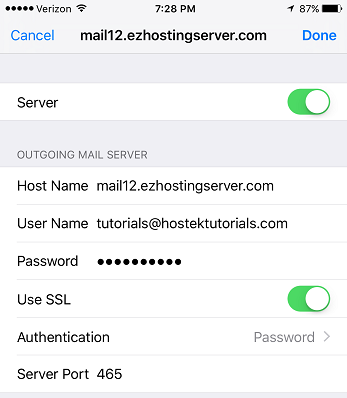
- We can now edit the outgoing server settings. By default 'SSL' is enabled. We will provide the settings to use below for SSL and non-SSL.
Non-SSL (standard):
- Please see our separate WIKI articles for what hostname you should use.
- User Name: The e-mail user your authenticating as (The address your setting your mail up for).
- Password: The password to the e-mail user your authenticating as.
- Use SSL: Turn OFF
- Authentication: Choose 'Password' as the authentication type.
- Server Port: 25, 26, or 587 (Port 25 is commonly blocked by ISPs due to spam issues. Not recommended.)
SSL (Secure):
- Please see our separate WIKI articles for what hostname you should use.
- User Name: The e-mail user your authenticating as (The address your setting your mail up for).
- Password: The password to the e-mail user your authenticating as.
- Use SSL: Turn ON
- Authentication: Choose 'Password' as the authentication type.
- Server Port: 465
Click 'Done' once you enter the correct SMTP information.
Incoming Advanced Settings
- Now that we've updated the SMTP settings go back to the 'Account Settings' and click 'Advanced' so we can update the incoming settings.
- We can now edit the incoming server settings. By default 'SSL' is enabled. We will provide the settings to use below for SSL and non-SSL.
Non-SSL (Standard):
- Use SSL: Turn OFF
- Authentication: Choose 'Password' as the authentication type.
- POP Server Port: 110
- IMAP Server Port: 143
SSL (Secure):
- Use SSL: Turn ON
- Authentication: Choose 'Password' as the authentication type.
- POP Server Port: 995
- IMAP Server Port: 993
- click 'Done' and you should be all set. You should now be able to send and receive mail using the 'Mail' application. You should see the new email account in the list of active email accounts ( It will show up under the description name you provided earlier ).
iPhone Calendar Sync with SmarterMail
NOTE: hostek.com is used in this example, so you will need to replace hostek.com with your domain.
On your iPhone do the following:
- Go to Settings
- Go to Mail, Contact, Calendars
- Go to Add Account...
- Select Other
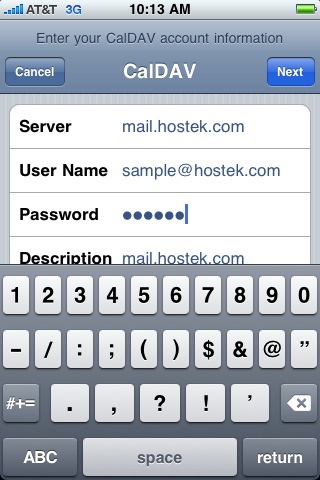
- Select Add CalDAV Account
- Server: mail.hostek.com/webdav (NOTE: The /webdav part will disappear after you tap the User Name field)
- User Name: enter your full email address (see screen shot for example)
- Password: enter your password for this email address
- Description: Leave or change as desired
- Select Next (NOTE: You will get a message about the certificate not being verified. Just accept the certificate).
- That's it. You should get a message it verified the account.
How to set up the iPhone so that it stores sent items on the server
Note: You must be using IMAP to use this setting.
- Click Settings
- Click Mail
- Click "Accounts"
- Select the Mail account you want to change
- Select 'Account' again.
- Scroll down and click on 'Advanced'.
- You will now see a screen that says Advanced. In this screen is a section called Mailbox Behaviours.
- Click on the Sent Mailbox button.
- This will now display two sections. On My Iphone and On the server.
- In the section On the server should be a list of all your mailboxes.
- scroll down to the Sent Items box on the mail server and select the Sent Items.
- When you send an email from your iphone, a copy will be passed to your mail server in the inbox you just selected.
