Difference between revisions of "Shared SSL"
(→Linux cPanel Customers) |
|||
| (2 intermediate revisions by 2 users not shown) | |||
| Line 28: | Line 28: | ||
For our cPanel customers, <b>this is enabled by default</b>. Just use your pre-propagation URL except with https:// instead of http:// | For our cPanel customers, <b>this is enabled by default</b>. Just use your pre-propagation URL except with https:// instead of http:// | ||
| − | Another Example: | + | Another Example: Use <b>https://</b> followed by your website name, then the server you are on. Take reference to the following: |
| − | + | ||
| − | + | ||
| + | <pre>https://yourdomain.com.cpXX.ezhostingserver.com/</pre>''In the example above, 'XX' is the server name and yourdomain.com is your website.'' | ||
| + | '''Note''': You must use the appropriate Shared SSL URL in order for it to work with your site. It will not work if you try to prefix your primary domain name with "https://". If you require this functionality please [[SSL_Certificates#Ordering_an_SSL_Certificate|order a dedicated SSL certificate]] for your site. | ||
== How Shared SSL Works == | == How Shared SSL Works == | ||
| Line 47: | Line 47: | ||
Maybe you're not using a cart, but just need to link to a secure form submission page. After setting up the Shared SSL, you would just set your link to link to the Shared SSL URL instead of the non secured URL. It's really a simple process. | Maybe you're not using a cart, but just need to link to a secure form submission page. After setting up the Shared SSL, you would just set your link to link to the Shared SSL URL instead of the non secured URL. It's really a simple process. | ||
| + | |||
| + | |||
| + | |||
| + | |||
| + | [[Category:Control_Panels]] | ||
| + | [[Category:Windows]] | ||
| + | [[Category:Linux]] | ||
| + | [[Category:Railo]] | ||
| + | [[Category:Coldfusion]] | ||
| + | [[Category:SSL-Certificates]] | ||
| + | [[Category:Shared_SSL]] | ||
Latest revision as of 16:23, 2 December 2016
Contents
Shared Secure Socket Layer (SSL) is a certificated that all of our customers can use. The Shared SSL certificated is intended for those who wish to have a secure connection, to say an admin area or a simple checkout process, but don't wish to purchase a Private SSL.
Normally, a Shared SSL is not the best choice for an e-commerce site, this is because most customers expect to see the domain name of the company in the URL address bar. Shared SSL will use our domain name (usually ezhostingserver.com or hostek.com) in place of your domain name.
NOTE:
- For our resellers, Hostek.com has a white label shared SSL for your customers to use.
- For information about Private SSL Certificates please visit http://hostek.com/web-hosting-ssl.asp
- Installing a purchased Private SSL please visit https://wiki.hostek.com/SSL_Certificates
Windows and ColdFusion Customers
The shared SSL can be enabled via the control panel for our Windows and ColdFusion hosting customers.
- Log in to WCP at https://wcp.hostek.com
- Locate the Security and SSL Section
- Click on the Shared SSL Icon
- Click Enable
- Copy the link in URL:
These Shared SSL URL's will look something like https://securex.ezhostingserver.com/yourdomain-com/
Linux cPanel Customers
For our cPanel customers, this is enabled by default. Just use your pre-propagation URL except with https:// instead of http://
Another Example: Use https:// followed by your website name, then the server you are on. Take reference to the following:
https://yourdomain.com.cpXX.ezhostingserver.com/In the example above, 'XX' is the server name and yourdomain.com is your website.
Note: You must use the appropriate Shared SSL URL in order for it to work with your site. It will not work if you try to prefix your primary domain name with "https://". If you require this functionality please order a dedicated SSL certificate for your site.
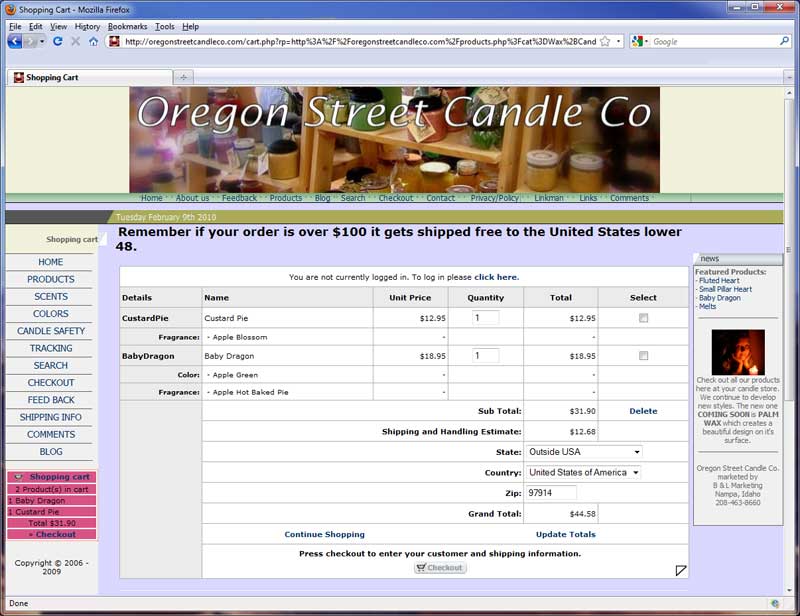
Here is a sample of how the Shared SSL Hosting works on our servers.
Notice the site look and how the URL is still on the main domain's site. In their cart, they have indicated the shared SSL URL for the checkout process. They will the be directed to the Secure URL for the checkout process. However, as mentioned before, it is optimal to have the whole cart in a secure environment so the customer feels secure the whole time.
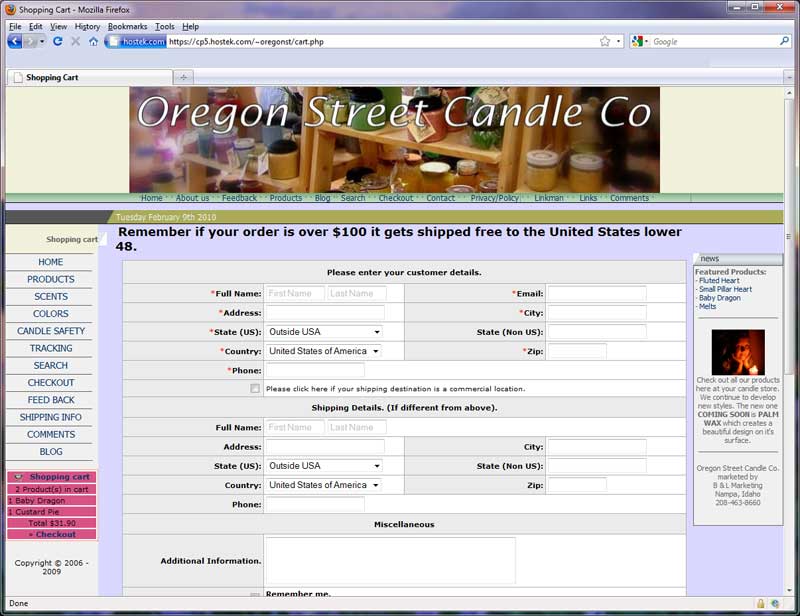
Now, after clicking "Checkout" the cart takes you to this Shared SSL page. Notice that the look of the site is the same. The URL changes based on the shared SSL URL for the site, which the cart owner entered in their cart setup.
Maybe you're not using a cart, but just need to link to a secure form submission page. After setting up the Shared SSL, you would just set your link to link to the Shared SSL URL instead of the non secured URL. It's really a simple process.

