Difference between revisions of "Enable Detailed Errors"
(Created page with "How to enable detailed errors on IIS 7+ (Windows 2008 and 2012). *Edit or create the file '''web.config''' within the folder in which detailed errors should be enabled. *Add ...") |
(→How do I enable / disable Robust Exception Information on my site?) |
||
| (3 intermediate revisions by 2 users not shown) | |||
| Line 1: | Line 1: | ||
| − | How to enable detailed errors on IIS 7+ (Windows 2008 and 2012) | + | ==How to enable detailed errors (ColdFusion, Railo, .Net) on IIS 7+ (Windows 2008 and 2012)== |
*Edit or create the file '''web.config''' within the folder in which detailed errors should be enabled. | *Edit or create the file '''web.config''' within the folder in which detailed errors should be enabled. | ||
| Line 14: | Line 14: | ||
*To re-enable custom errors (or non-detailed errors), update the '''web.config''' file changing the '''errorMode''' attribute from '''Detailed''' to '''Custom'''. | *To re-enable custom errors (or non-detailed errors), update the '''web.config''' file changing the '''errorMode''' attribute from '''Detailed''' to '''Custom'''. | ||
| + | ==How do I enable / disable Robust Exception Information on my site?== | ||
| + | To enable Robust Exception Information on a ColdFusion site, you will need to add the following to the top of your Application.cfc file: | ||
| + | <pre><cfset this.enablerobustexception = true /></pre><br /> | ||
| + | However, if the site is on a server with Robust Exception Information enabled, and you wish to disable Robust Exception Information, add this to the site's Application.cfc: | ||
| + | <pre><cfset this.enablerobustexception = false /></pre> | ||
| + | If no Applciation.cfc exists, make a file called Application.cfc and take the code below. Paste it in and save. | ||
| + | <pre> | ||
| + | <cfcomponent displayname="Application" output="true"> | ||
| + | <cfset THIS.Name = "Debugging" /> | ||
| + | <cfset this.enablerobustexception = true /> | ||
| + | </cfcomponent> | ||
| + | </pre> | ||
| + | |||
| + | ==How to enable Railo Debugging== | ||
| + | ===Enable Railo Debug Logging=== | ||
| + | To enable Railo debug logging do the following: | ||
| + | *Log-in to your site's Railo Web Administrator through your control panel. | ||
| + | *Click the ''Debugging -> Settings'' link in the left-hand navigation menu | ||
| + | *On the next page, select the ''Yes'' radio button and select the type of details you want logged. <br /> [[File:Railo-debug-log.png]] | ||
| + | *Click ''Update'' to save your changes. | ||
| + | |||
| + | Debug info will be logged to the log files accessible within the Railo Web Administrator. To see the debug output on your site, you'll need to create a debug output template as shown below. | ||
| + | ===Enable Railo Debug Output Template=== | ||
| + | To enable Railo debug output, you'll need to create a debug template: | ||
| + | *Log-in to your site's Railo Web Administrator through your control panel. | ||
| + | *Click the ''Debugging -> Templates'' link in the left-hand navigation menu | ||
| + | *On the next page enter a ''Label'' for the new template, select the type of template you want (''Classic, Comment, or Modern'') then click ''Create''. <br /> [[File:Railo-debug-output1.png]] | ||
| + | *On the next page, you can choose the type of output you want, and you can also restrict the debug output to only be shown to a set of IP addresses. <br /> [[File:Railo-debug-output2.png]] | ||
| + | *Click ''submit'' to save your changes. | ||
| + | |||
| + | Now you'll see debug output for the pages on your site. | ||
[[Category:Windows]] | [[Category:Windows]] | ||
| + | [[Category:ColdFusion]] | ||
| + | [[Category:Railo]] | ||
Latest revision as of 18:04, 8 May 2015
Contents
How to enable detailed errors (ColdFusion, Railo, .Net) on IIS 7+ (Windows 2008 and 2012)
- Edit or create the file web.config within the folder in which detailed errors should be enabled.
- Add the following:
<configuration>
   <system.webServer>
      <httpErrors errorMode="Detailed" />
   </system.webServer>
</configuration>
NOTE: If any of the above sections already exist in the web.config" file, edit the existing sections. Do not duplicate.
- To re-enable custom errors (or non-detailed errors), update the web.config file changing the errorMode attribute from Detailed to Custom.
How do I enable / disable Robust Exception Information on my site?
To enable Robust Exception Information on a ColdFusion site, you will need to add the following to the top of your Application.cfc file:
<cfset this.enablerobustexception = true />
However, if the site is on a server with Robust Exception Information enabled, and you wish to disable Robust Exception Information, add this to the site's Application.cfc:
<cfset this.enablerobustexception = false />
If no Applciation.cfc exists, make a file called Application.cfc and take the code below. Paste it in and save.
<cfcomponent displayname="Application" output="true">
<cfset THIS.Name = "Debugging" />
<cfset this.enablerobustexception = true />
</cfcomponent>
How to enable Railo Debugging
Enable Railo Debug Logging
To enable Railo debug logging do the following:
- Log-in to your site's Railo Web Administrator through your control panel.
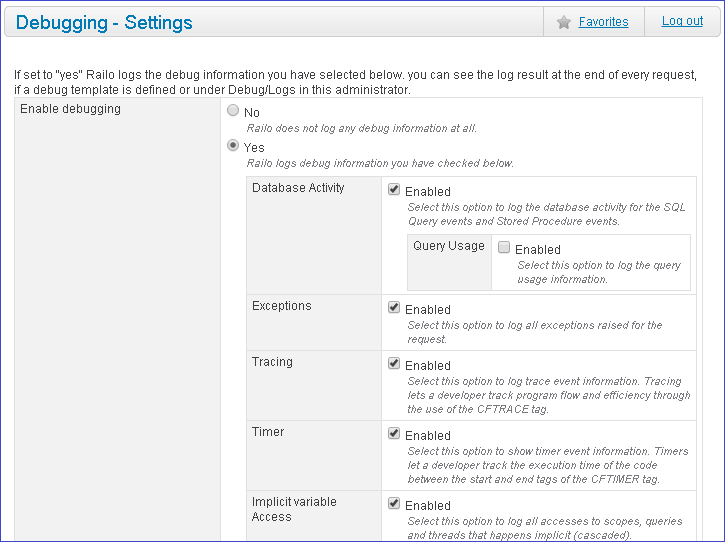
- Click the Debugging -> Settings link in the left-hand navigation menu
- On the next page, select the Yes radio button and select the type of details you want logged.

- Click Update to save your changes.
Debug info will be logged to the log files accessible within the Railo Web Administrator. To see the debug output on your site, you'll need to create a debug output template as shown below.
Enable Railo Debug Output Template
To enable Railo debug output, you'll need to create a debug template:
- Log-in to your site's Railo Web Administrator through your control panel.
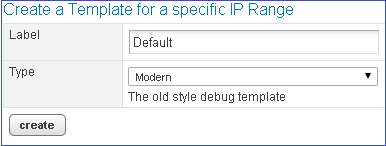
- Click the Debugging -> Templates link in the left-hand navigation menu
- On the next page enter a Label for the new template, select the type of template you want (Classic, Comment, or Modern) then click Create.

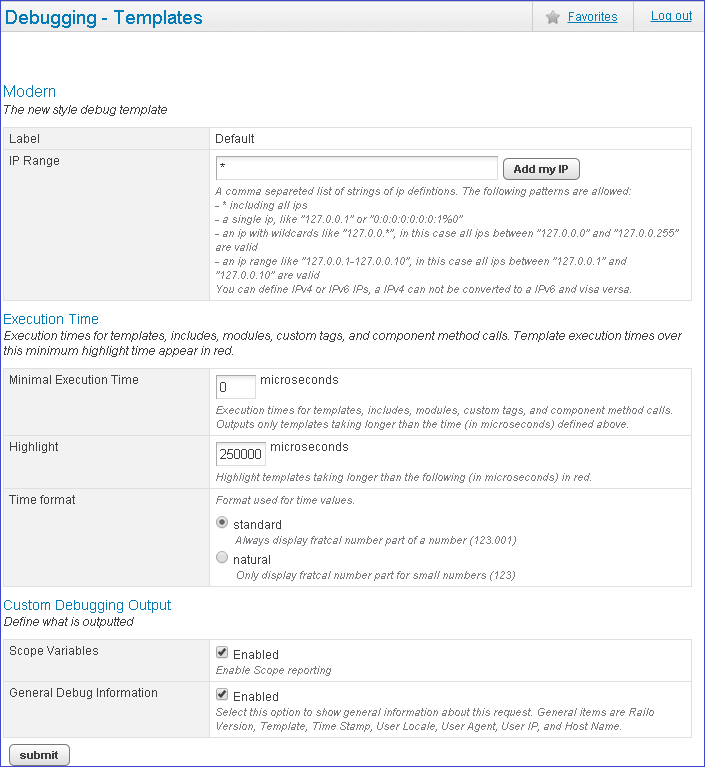
- On the next page, you can choose the type of output you want, and you can also restrict the debug output to only be shown to a set of IP addresses.

- Click submit to save your changes.
Now you'll see debug output for the pages on your site.