Difference between revisions of "Adding Additional Control Panel Logins"
From Hostek.com Wiki
(→Adding Additional Control Panel Logins) |
(Added Screenshots and modified structure.) |
||
| (3 intermediate revisions by one other user not shown) | |||
| Line 1: | Line 1: | ||
| − | + | This WCP feature allows for additional control panel logins to be create for a domain. These additional logins can be presented to Website Adminstrators and Developers involved in editing or managing the website. | |
| − | This WCP feature allows for additional control panel logins to be create for a domain. These additional logins can be presented to Website Adminstrators and Developers involved in editing or managing the website. To utilize this feature please navigate to the [https://wcp.hostek.com '''WCP'''] URL and | + | |
| + | ==Control Panel Login== | ||
| + | *To utilize this feature please navigate to the [https://wcp.hostek.com '''WCP'''] URL and then locate the '''"Control Panel Logins"''' button using the following path: | ||
*'''WCP''' (login and select domain) >> '''Domain Settings(section)''' >> '''Control Panel Logins''' | *'''WCP''' (login and select domain) >> '''Domain Settings(section)''' >> '''Control Panel Logins''' | ||
| − | + | <div style="margin: 20px 0px 20px 0px"> | |
| + | [[Image:WCP_addtl_cp_lgn_btn.png|border]] | ||
| + | </div> | ||
*Clicking on the '''"Control Panel Logins"''' button will display the additional Control Panel user accounts that have been created. | *Clicking on the '''"Control Panel Logins"''' button will display the additional Control Panel user accounts that have been created. | ||
| − | **If a secondary Control Panel user has not yet been created this dialog box will be empty. | + | **If a secondary Control Panel user has not yet been created, this dialog box will be empty. |
| − | **If a secondary Control Panel user has been created, the created | + | **If a secondary Control Panel user(s) has been created, the created user(s) will be displayed with more detailed information for each individual user. |
| + | [[Image:WCP_addtl_cp_usr.png|border]] | ||
| − | + | ==Add Control Panel Login== | |
*Create new users to have a specific access to the site's WCP interface. | *Create new users to have a specific access to the site's WCP interface. | ||
#Click the '''"Add"''' to create a new secondary User for WCP access to your domain. | #Click the '''"Add"''' to create a new secondary User for WCP access to your domain. | ||
| + | #:[[Image:WCP_addtl_cp_nw_usr.png|border]] | ||
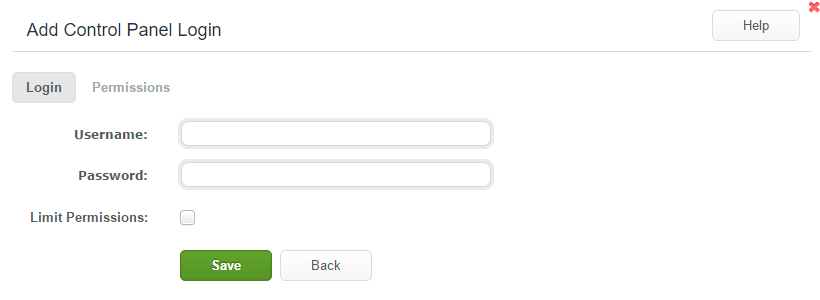
#Enter the ''"Username"'' and ''"Password"'' and if the user needs to have limited access to the WCP features, check the ''"Limit Permissions"'' checkbox. | #Enter the ''"Username"'' and ''"Password"'' and if the user needs to have limited access to the WCP features, check the ''"Limit Permissions"'' checkbox. | ||
| + | #:[[Image:WCP_addtl_cp_lgn_lmt_prm.png|border]] | ||
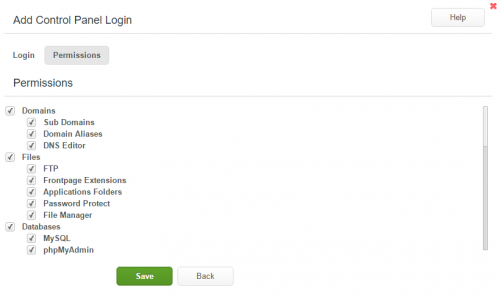
#*Checking the ''"Limit Permissions"'' will load the '''"Permissions"''' Tab. From the Permissions tab the user can be limited to what WCP features the user account will have to access. This will also be displayed when accessing the '''"Control Panel Logins"''' by a checkmark on the right side of the dialog box. | #*Checking the ''"Limit Permissions"'' will load the '''"Permissions"''' Tab. From the Permissions tab the user can be limited to what WCP features the user account will have to access. This will also be displayed when accessing the '''"Control Panel Logins"''' by a checkmark on the right side of the dialog box. | ||
| + | #:[[Image:WCP_addtl_cp_lgn_prms.png|border|500px]] | ||
#Once the user's permissions are set, click back to the '''"Login"''' tab and then click the '''Save''' icon at the bottom of the dialog box to create the new user account. | #Once the user's permissions are set, click back to the '''"Login"''' tab and then click the '''Save''' icon at the bottom of the dialog box to create the new user account. | ||
#Once the secondary user has been created, the newly created user's interface can be accessed by going to the [https://wcp.hostek.com '''WCP'''] URL and using the username and password that were previously setup. | #Once the secondary user has been created, the newly created user's interface can be accessed by going to the [https://wcp.hostek.com '''WCP'''] URL and using the username and password that were previously setup. | ||
| − | + | ==Edit Control Panel Login== | |
*Edit the details of a created Control Panel user account. | *Edit the details of a created Control Panel user account. | ||
#From the WCP Control Panel interface, click the '''"Control Panel Logins"''' button. | #From the WCP Control Panel interface, click the '''"Control Panel Logins"''' button. | ||
#Next click the '''"Pencil Icon"''', located on the left side of the desired user account. | #Next click the '''"Pencil Icon"''', located on the left side of the desired user account. | ||
| + | #:[[Image:WCP_addtl_cp_lgn_exst_edt.png|border]] | ||
#Similarly to how the user create the ''Username'', ''Password'', and ''Permissions'' can be modified to meet the needs of the user account. | #Similarly to how the user create the ''Username'', ''Password'', and ''Permissions'' can be modified to meet the needs of the user account. | ||
#When the user's detail have been properly updated, click the '''"Save"''' to make the edits effective for the user account. | #When the user's detail have been properly updated, click the '''"Save"''' to make the edits effective for the user account. | ||
| − | + | ==Remove a Control Panel Login== | |
*Delete a Control Panel User account from the WCP interface. | *Delete a Control Panel User account from the WCP interface. | ||
#From the WCP Control Panel interface, click the '''"Control Panel Logins"''' button. | #From the WCP Control Panel interface, click the '''"Control Panel Logins"''' button. | ||
#Next click the '''"Trashcan Icon"''' located on the right side of the desired user account. | #Next click the '''"Trashcan Icon"''' located on the right side of the desired user account. | ||
| + | #:[[Image:WCP_addtl_cp_lgn_exst_del.png|border]] | ||
#After selecting the '''"Trashcan Icon"''', a pop-up will appear confirming the user account deletion. Click '''"OK"''' to delete the user account or '''"Cancel"''' to cancel the request. | #After selecting the '''"Trashcan Icon"''', a pop-up will appear confirming the user account deletion. Click '''"OK"''' to delete the user account or '''"Cancel"''' to cancel the request. | ||
| − | + | ||
| − | + | [[Category:WCP (Windows based Control Panel) ]] | |
| − | + | ||
| − | + | ||
| − | [[Category:WCP ]] | + | |
Latest revision as of 22:40, 11 April 2017
This WCP feature allows for additional control panel logins to be create for a domain. These additional logins can be presented to Website Adminstrators and Developers involved in editing or managing the website.
Contents
Control Panel Login
- To utilize this feature please navigate to the WCP URL and then locate the "Control Panel Logins" button using the following path:
- WCP (login and select domain) >> Domain Settings(section) >> Control Panel Logins
- Clicking on the "Control Panel Logins" button will display the additional Control Panel user accounts that have been created.
- If a secondary Control Panel user has not yet been created, this dialog box will be empty.
- If a secondary Control Panel user(s) has been created, the created user(s) will be displayed with more detailed information for each individual user.
Add Control Panel Login
- Create new users to have a specific access to the site's WCP interface.
- Click the "Add" to create a new secondary User for WCP access to your domain.
- Enter the "Username" and "Password" and if the user needs to have limited access to the WCP features, check the "Limit Permissions" checkbox.
- Checking the "Limit Permissions" will load the "Permissions" Tab. From the Permissions tab the user can be limited to what WCP features the user account will have to access. This will also be displayed when accessing the "Control Panel Logins" by a checkmark on the right side of the dialog box.
- Once the user's permissions are set, click back to the "Login" tab and then click the Save icon at the bottom of the dialog box to create the new user account.
- Once the secondary user has been created, the newly created user's interface can be accessed by going to the WCP URL and using the username and password that were previously setup.
Edit Control Panel Login
- Edit the details of a created Control Panel user account.
- From the WCP Control Panel interface, click the "Control Panel Logins" button.
- Next click the "Pencil Icon", located on the left side of the desired user account.
- Similarly to how the user create the Username, Password, and Permissions can be modified to meet the needs of the user account.
- When the user's detail have been properly updated, click the "Save" to make the edits effective for the user account.
Remove a Control Panel Login
- Delete a Control Panel User account from the WCP interface.
- From the WCP Control Panel interface, click the "Control Panel Logins" button.
- Next click the "Trashcan Icon" located on the right side of the desired user account.
- After selecting the "Trashcan Icon", a pop-up will appear confirming the user account deletion. Click "OK" to delete the user account or "Cancel" to cancel the request.


