Difference between revisions of "Installing and Configuring FuseGuard"
(→Installing the FuseGuard Web Application Firewall) |
m (→If using Application.cfm) |
||
| (One intermediate revision by the same user not shown) | |||
| Line 31: | Line 31: | ||
*Set ''variables.datasource'' to the datasource (DSN) you created earlier | *Set ''variables.datasource'' to the datasource (DSN) you created earlier | ||
*Change ''variables.db_type'' from ''derby'' to the type of database you're using (''mysql'' or ''sqlserver'') | *Change ''variables.db_type'' from ''derby'' to the type of database you're using (''mysql'' or ''sqlserver'') | ||
| − | + | ||
====Modify Application to utilize FuseGuard==== | ====Modify Application to utilize FuseGuard==== | ||
=====If using Application.cfc===== | =====If using Application.cfc===== | ||
| Line 61: | Line 61: | ||
</syntaxhighlight> | </syntaxhighlight> | ||
| − | After editing your Application.cfc/Application.cfm, you may log into the FuseGuard manager at http://yoursite.com/fuseguard/manager/ | + | After editing your Application.cfc/Application.cfm, you may log into the FuseGuard manager at http://yoursite.com/fuseguard/manager/ ''(user: admin, pass: admin)'' |
==Configuring FuseGuard== | ==Configuring FuseGuard== | ||
Latest revision as of 21:25, 29 January 2015
Contents
Installing the FuseGuard Web Application Firewall
Download Fuseguard
To get started, | request an evaluation copy of FuseGuard from the Foundeo Web site. Once approved, you'll receive an email containing a download link for Fuseguard.
Installing FuseGuard on your Web Site
Extract FuseGuard
- Once you've downloaded the FuseGuard ZIP file, extract it to your site's Web root.
Create Database and Datasource
- Next, create a MySQL or MS SQL Server database within your control panel.
- When creating the database, choose the option to create a ColdFusion datasource (DSN) for the database
Now that you've created your database and DSN, we need to create the database schema. Follow the directions below for the database platform being used:
- MySQL
- Extract the sql/mysql.sql SQL file from the FuseGuard zip file to your computer.
- Log into your database via phpMyAdmin within your control panel
- Click your database name on the left-hand navigation within phpMyAdmin
- Click the Import tab at the top of the page
- On the next page, click the Choose file button then select the sql/mysql.sql file you extracted earlier.
- Click Go at the bottom of the page, and phpMyAdmin will create the tables for FuseGuard
- MS SQL Server
- Extract the sql/sqlserver.sql SQL file from the FuseGuard zip file to your computer.
- Log into your database via MyLittleAdmin within the SQL Tools section of your control panel
- Click the Tools link on the left-hand navigation, then click New Query
- Open the sql/sqlserver.sql SQL file you extracted earlier in a text editor such as Notepad or Notepad++.
- Copy the text from the SQL file into the New Query window, then click Submit to have MyLittleAdmin create FuseGuard's tables.
Create your FuseGuard Configurator
Now we need to create a configurator for FuseGuard to use on your site. A configurator defines details about your FuseGuard installation such as what datasource to use and which firewall filters are in-place on the site.
To create your site's configurator, copy fuseguard/components/configurators/DefaultConfigurator.cfc to fuseguard/components/configurators/MyConfigurator.cfc on your site.
Now edit MyConfigurator.cfc (you can use the control panel's File Manager) and make the following changes:
- Set variables.email to your email address
- Set variables.datasource to the datasource (DSN) you created earlier
- Change variables.db_type from derby to the type of database you're using (mysql or sqlserver)
Modify Application to utilize FuseGuard
If using Application.cfc
If your site uses an Application.cfc file, you need to do two things:
- Add extends="fuseguard.components.FuseGuardApplication" to the cfcomponent tag
- Invoke fuseguard() within the onRequestStart() method
This example shows what the code will look like after both steps have been implemented:
<cfcomponent extends="fuseguard.components.FuseGuardApplication">
	<cffunction name="onRequestStart" returntype="boolean">
		<cfset fuseguard(configurator="DefaultConfigurator", scope="application")>
		<!--- your custom onRequestStartCode goes here --->
		<cfreturn true>
	</cffunction>
</cfcomponent>
Note: Be sure not to have multiple onRequestStart() methods within your Application.cfc file
If using Application.cfm
If your site uses an Application.cfm file, add the following code below the cfapplication tag:
<cfif NOT IsDefined("application.fuseguard") OR application.fuseguard.shouldReInitialize()>
	<cfinvoke component="fuseguard.components.firewall" method="init" returnvariable="application.fuseguard">
		<cfinvokeargument name="configurator" value="MyConfigurator">
	</cfinvoke>
</cfif>
<cfset application.fuseguard.processRequest()>
After editing your Application.cfc/Application.cfm, you may log into the FuseGuard manager at http://yoursite.com/fuseguard/manager/ (user: admin, pass: admin)
Configuring FuseGuard
Disabling a FuseGuard Filter
FuseGuard filters can be enabled/disabled as you wish. To do so, you'll need to edit your configurator then reload the configuration through the FuseGuard manager.
Edit MyConfigurator.cfc
- First, open MyConfigurator.cfc in a text editor. Anything below ~line 62 in this file is related to the filters enabled for your site.
- To disable a filter, find the section of code for the filter you want disabled, then surround the filter's code with ColdFusion comments.
For example:
<!--- Simple IP Blocking Filter - blocks by IP address --->
<!--- UNCOMMENT TO USE
<cfset filter = firewall.newFilterInstance("SimpleIPBlockingFilter")>
<cfset filter.blockIP("10.11.12.13")>
<cfset firewall.addFilter( filter )>
--->
Reload Configuration
- Once you've saved your changes to MyConfigurator.cfc, log into the FuseGuard manager at http://yoursite.com/fuseguard/manager/
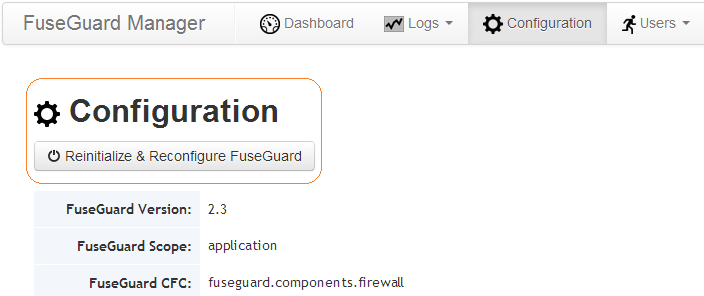
- After logging into the manager, click the Configuration link at the top of the page.
- Click the Reinitialize and Reconfigure FuseGuard button to force-through your adjustments
